WinPHOTON Tutorial
Contents
- Overview.
- Open a PHI (XYZ) file.
- Open a XYZ file.
- Plot Grid.
- Dump Screen.
- Delete Plotted Element(s)).
- Plot Contours.
- Plot Parsol Contours.
- Plot Contour Lines.
- Plot Contours by Depth.
- Plot Contour by Number.
- Plot Iso-Surface.
- Plot Vectors.
- Plot Vectors in Parsol case.
- Plot StreamLines.
- Select a Plotting Colour.
- Set a Plot Region.
- Write Text.
- Changes the orientation of the plot
- Use No Smooth contour mode.
- Look of variable values.
- Use calculated field variables.
Overview
This tutorial shows you how to use the menu system of WinPHOTON.
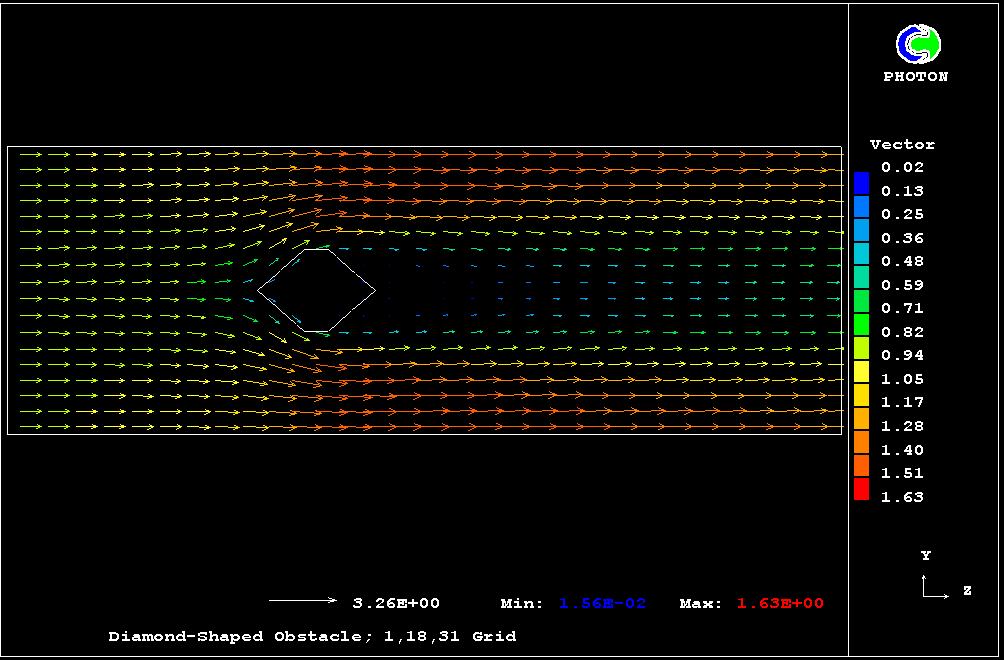
Results from the simulation of two flows:
- flow in a radial impeller,
- flow around a diamond-shaped obstacle
will be used in the examples.
Open a PHI (and XYZ) file(s)
To open PHI file (and XYZ file ):
- Select "File/Open PHI/XYZ file" menu,
- Click "PHI-Name" Browse button and select TUTO directory (C:\PHOENICS\D_PHOTON\TUTO) in OpenFile dialog,
- Select file "TUTO1.PHI",
- Click OK button.
In command mode will enter following commands:
- PHI
- C:\PHOENICS\D_PHOTON\TUTO\tuto1.phi
- <Enter>,
- <Enter>,
- <Enter>
NOTE. If your files located in current directory (D_PRIV1), the path in filename possible not to indicate.
Open XYZ file
To open XYZ file only:
- Select "File/Open PHI/XYZ file" menu,
- Check "XYZ only" radio-button,
- Click "XYZ-Name" Browse button and select TUTO directory (C:\PHOENICS\D_PHOTON\TUTO) in OpenFile dialog,
- Select file "TUTO1.XYZ",
- Click OK button.
In command mode will enter following commands:
- XYZ
- C:\PHOENICS\D_PHOTON\TUTO\tuto1.xyz
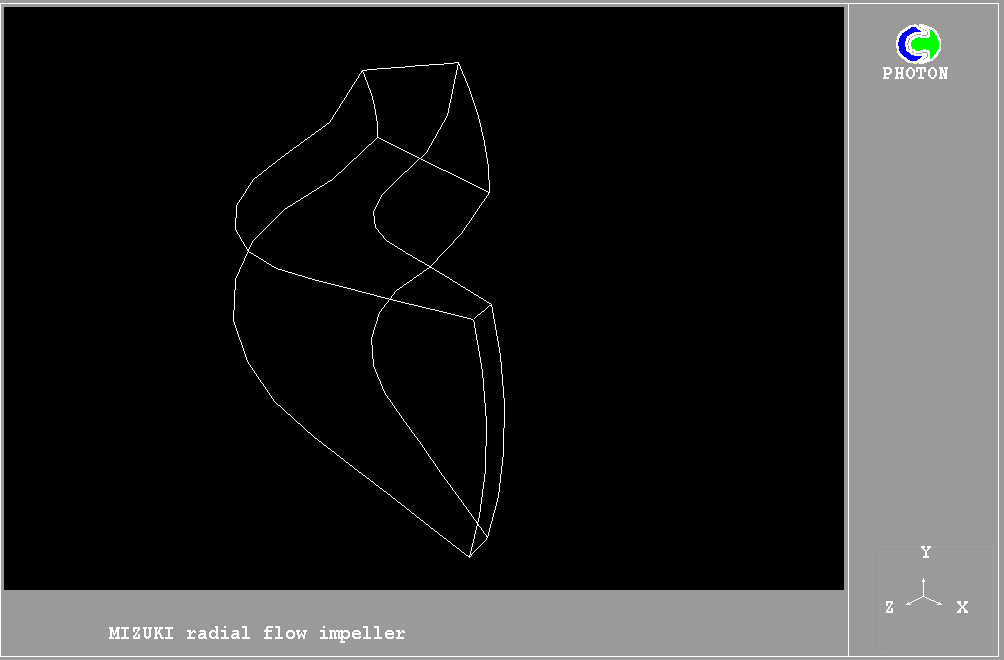
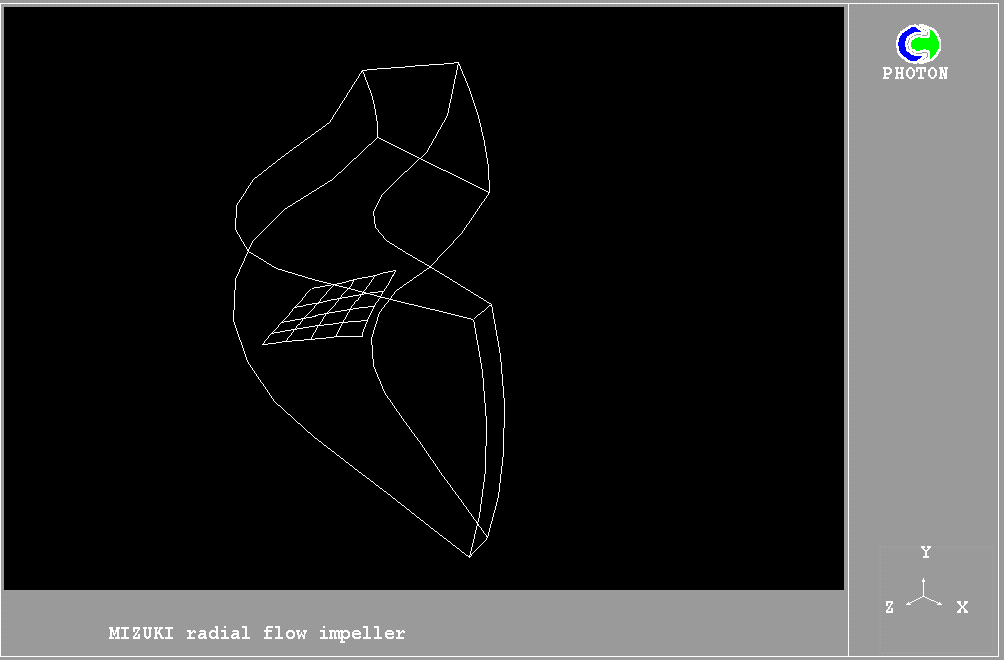
Plot Grids
To plot the grid outline :
- Open the result file - Open a PHI file or (if it already open) select "Draw/Clear" menu,
- Select "Draw/Grids" menu,
- Press "Add" button,
- Check "Outline" box,
- Click "Z" radio-button in GroupBox "Plane",
- Type "0" in EditBox "PlnNo" (or select with Spin button),
- Press "Add" button,
- Click "Y" radio-button in GroupBox "Plane",
- Type "0" in EditBox "PlnNo" (or select with Spin button),
- Press "Add" button,
- Click "X" radio-button in GroupBox "Plane",
- Type "0" in EditBox "PlnNo" (or select with Spin button),
- Press "Add" button,
- Press "Close" button,
- Press "Close" button.
In command mode will enter following commands:
- GRID OUT X 1 Z 1 12 Y 1 5 COL 1 DASH 0
- GRID OUT X 6 Z 1 12 Y 1 5 COL 1 DASH 0
- GRID OUT Y 1 X 1 5 Z 1 12 COL 1 DASH 0
- GRID OUT Y 6 X 1 5 Z 1 12 COL 1 DASH 0
- GRID OUT Z 1 X 1 5 Y 1 5 COL 1 DASH 0
- GRID OUT Z 13 X 1 5 Y 1 5 COL 1 DASH 0
The result of plotting is shown below.
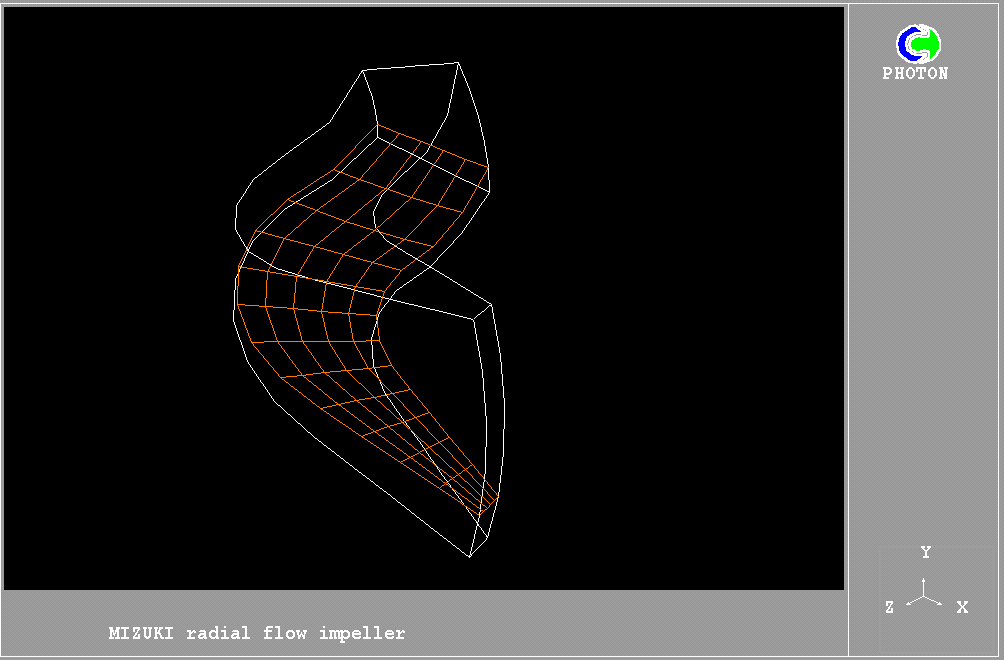
To plot a grid on plane X=2:
- Select "Draw/Grids" menu,
- Press "Add" button,
- Click "X" radio-button in GroupBox "Plane",
- Type "2" in EditBox " PlnNo ",
- Select red colour in ComboBox " Color",
- Press "Add" button,
- Press "Close" button,
- Press "Close" button.
In command mode will enter following command:
- GRID X 2 Z 1 12 Y 1 5 COL 13 DASH 0
The result of plotting is shown below.
Dump Screen.
To create a plot to be saved by screen dumping:
- Select "File/Open Photon use file" menu,
- Click "Browse" button and select "Tuto1.u01" file in Open file dialog,
- Click "OK" button.
To dump screen, select "File/Save Window as" menu and type a name of the
bitmap file in Save file dialog.
In command mode will enter following command:
- DUMP <Name>
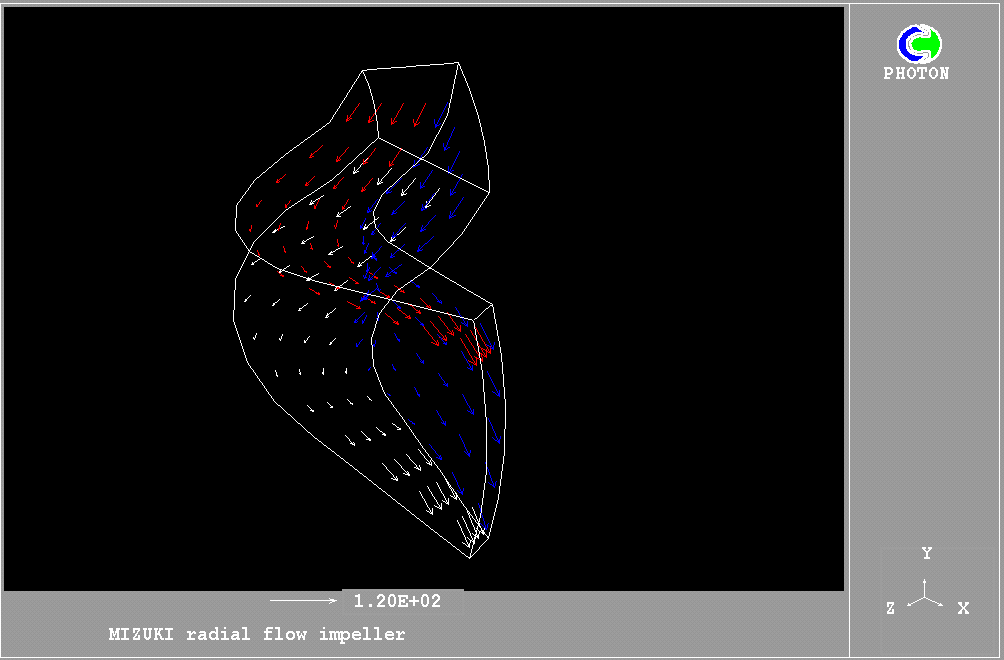
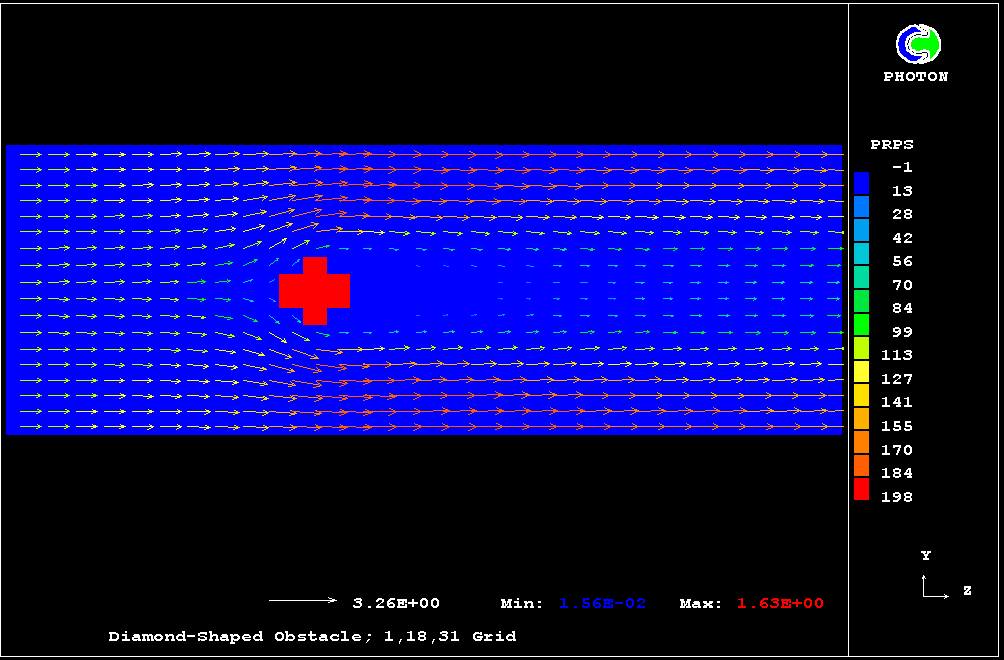
Delete Plotted Element(s))
To delete all plotted elements select "Draw/Clear" menu.
To create plots (the outline grids, vectors on plane X 1 in WHITE colour,
Vectors on plane X 5 in RED colour and Vectors on plane Y 1 in BLUE colour):
- Select "File/Open Photon use file" menu,
- Click "Browse" button and select "Tuto1.u02" file in Open file dialog,
- Click "OK" button.
In command mode will enter following command:
- USE C:\PHOENICS\D_PHOTON\TUTO\tuto1.u02
The result of plotting is shown below.
For delete the last vector element (on plane Y 1, in BLUE):
- Select "Draw/Vector" menu,
- Select last item in listbox,
- Press "Delete" button,
- Press "Close" button.
In command mode will enter following command:
- VEctor Delete
The result of plotting is shown below.
For delete all vector elements:
- Select "Draw/Vector" menu,
- Press "Delete All" button,
- Press "Close" button.
In command mode will enter following command:
- VEctor CLEar
To be turned ON/OFF Vector element:
- Select "Draw/Vector" menu,
- Select plotted element in ListBox,
- Press "On/OFF" button,
- Press "Close" button.
In command mode will enter following command:
- VEctor ON/OFF <Index vector element>
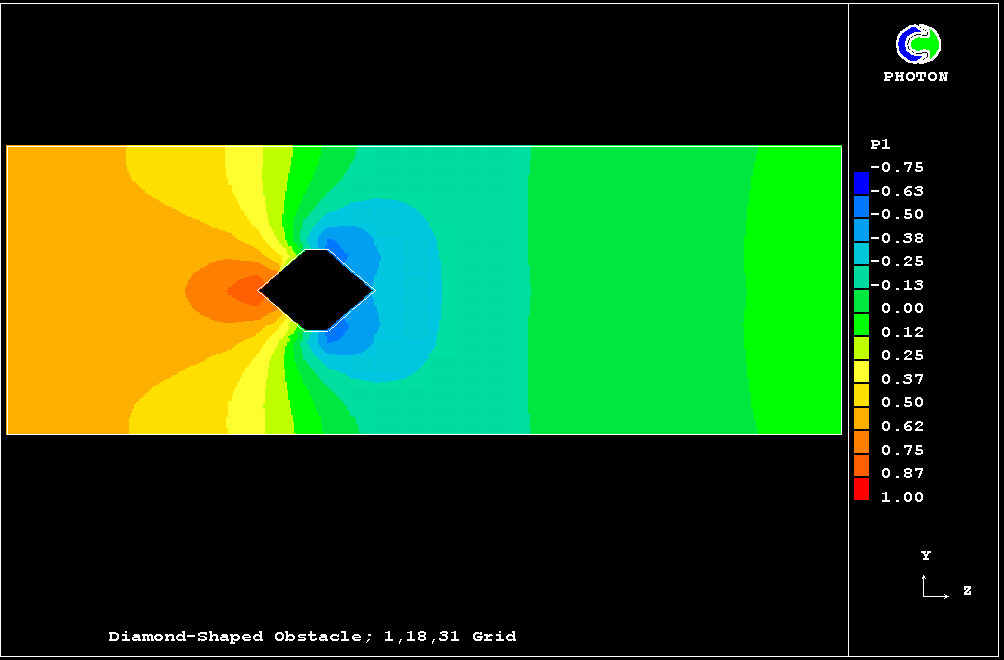
Plot Contours.
To plot a pressure contour on the surface of plane X=2:
- Open the result file - Open a PHI file or (if it already open) select "Draw/Clear" menu,
- Select "Draw/Contour" menu,
- Press "Add" button,
- Click "X" radio-button in GroupBox "Plane",
- Type "2" in EditBox " PlnNo " (or select with Spin-Button),
- Press "Add" button,
- Press "Close" button,
- Press "Close" button.
In command mode will enter following command:
- CONtour P1 X 2 Y 1 5 Z 1 12 FILL; 2.00E-03
To plot grid outlines around the contours:
- Select "File/Open Photon use file" menu,
- Click "Browse" button and select "Tuto1.u03" file in Open file dialog,
- Click "OK" button.
The result of plotting is shown below.

Plot Parsol Contours.
To plot a pressure contour on the surface of plane X=1:
- Open the result file "PARSOL.PHI" - Open a PHI file,
- Select "Draw/Contour" menu,
- Press "Add" button,
- Click "X" radio-button in GroupBox "Plane",
- Press "Add" button,
- Press "Close" button,
- Press "Close" button.
In command mode will enter following command:
- CONtour P1 X 1 Y 1 5 Z 1 12 FILL; 2.00E-03
To plot grid outlines around the contours:
- Select "File/Open Photon use file" menu,
- Click "Browse" button and select "Tuto1.u04" file in Open file dialog,
- Click "OK" button.
The result of plotting is shown below.
Plot Contour Lines.
To plot a pressure contour lines on the surface of plane X=2:
- Open the result file - Open a PHI file or (if it already open)
select "Draw/Clear" menu,
- Select "Draw/Contour" menu,
- Press "Add" button,
- Click "X" radio-button in GroupBox " Plane",
- Type "2" in EditBox " PlnNo " (or select with Spin-Button),
- Check "Isolines Style" button and type "20" in EditBox "Int",
- Press "Add" button,
- Press "Close" button,
- Press "Close" button.
In command mode will enter following command:
- CONtour P1 X 2 Y 1 5 Z 1 12 SH DASH 0 ;INT 20
To plot grid outlines around the contours:
- Select "File/Open Photon use file" menu,
- Click "Browse" button and select "Tuto1.u03" file in Open file dialog,
- Click "OK" button.
The result of plotting is shown below.
Plot Contours by Depth.
Open the result file - Open a PHI file or (if it already open) select "Draw/Clear" menu.
Select "Setting/Set Params" menu and click "Depth" radio button.
To plot a pressure contour on the surface of plane X=2:
- Select "Draw/Contour" menu,
- Press "Add" button,
- Click "X" radio button in GroupBox "Plane",
- Type "3" in Edit Box "Dep:",
- Type "2" in EditBox " PlnNo " (or select with Spin-Button),
- Press "Add" button,
- Press "Close" button,
- Press "Close" button.
In command mode will enter following commands:
- SET CON FILL DEPTH; 3
- CONtour P1 X 2 Y 1 5 Z 1 12 FILL;
To plot grid outlines around the contours:
- Select "File/Open Photon use file" menu,
- Click "Browse" button and select "Tuto1.u03" file in Open file dialog,
- Click "OK" button.
The result of plotting is shown below.

Plot Contours by Number.
Open the result file - Open a PHI file or (if it already open) select "Draw/Clear" menu. Select "Setting/Set Params" menu and click "Number" radio-button.
To plot a pressure contour on the surface of plane X=2:
- Select "Draw/Contour" menu,
- Press "Add" button,
- Click "X" radio-button in GroupBox "Plane",
- Type"4" in Edit Box "Num:",
- Type "2" in EditBox " PlnNo " (or select with Spin-Button),
- Press "Add" button,
- Press "Close" button,
- Press "Close" button.
In command mode will enter following commands:
- SET CON FILL NUMBER
- CONtour P1 X 2 Y 1 5 Z 1 12 FILL; 4
To plot grid outlines around the contours:
- Select "File/Open Photon use file" menu,
- Click "Browse" button and select "Tuto1.u03" file in Open file dialog,
- Click "OK" button.
The result of plotting is shown below.
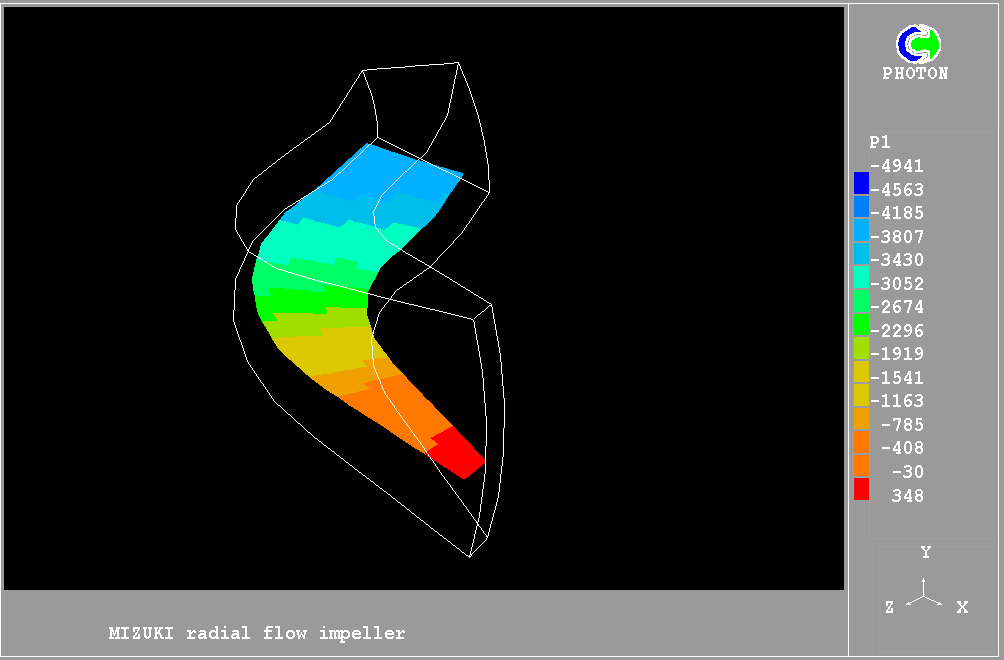
Plot Iso-Surface.
To Plot an Iso-Surface :
- Open the result file - Open a PHI file or (if it already open) select "Draw/Clear" menu,
- Select "Draw/Surface" menu,
- Type "-2000" in the EditBox "Value"( which is represented by the iso-surface),
- Click "X" radio-button in GroupBox "Plane",
- Press "Add" button,
- Click "Y" radio-button in GroupBox "Plane",
- Press "Add" button,
- Press "Close" button,
- Press "Close" button.
To plot grid outlines around the iso-surfaces:
- Select "File/Open Photon use file" menu,
- Click "Browse" button and select "Tuto1.u03" file in Open file dialog,
- Click "OK" button.
In command mode will enter following commands:
- SET CON FILL NUMBER
- CONtour P1 X 2 Y 1 5 Z 1 12 FILL; 4
The result of plotting is shown below.
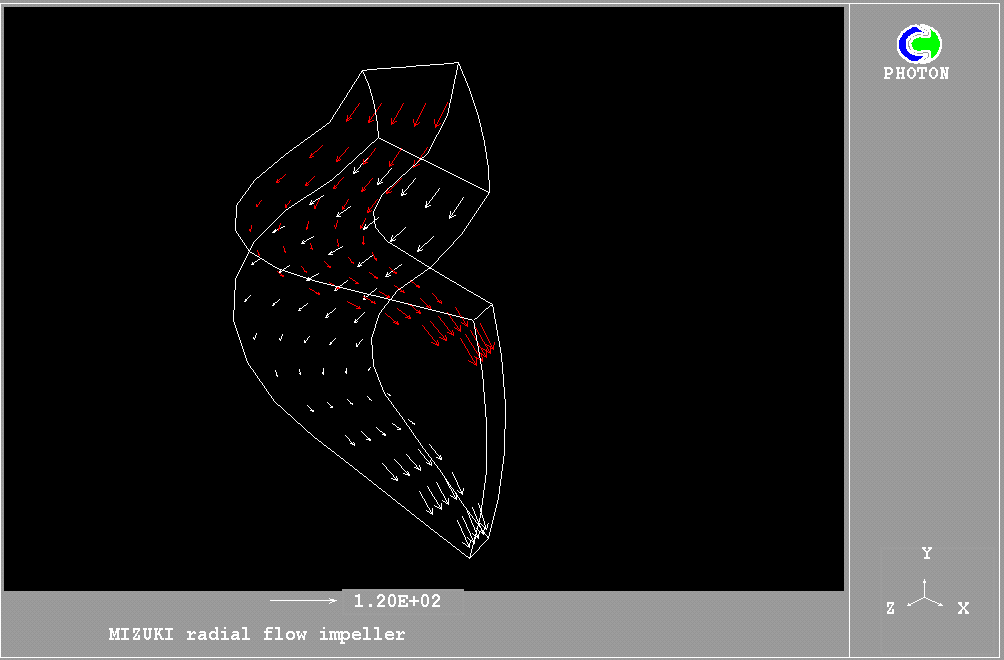
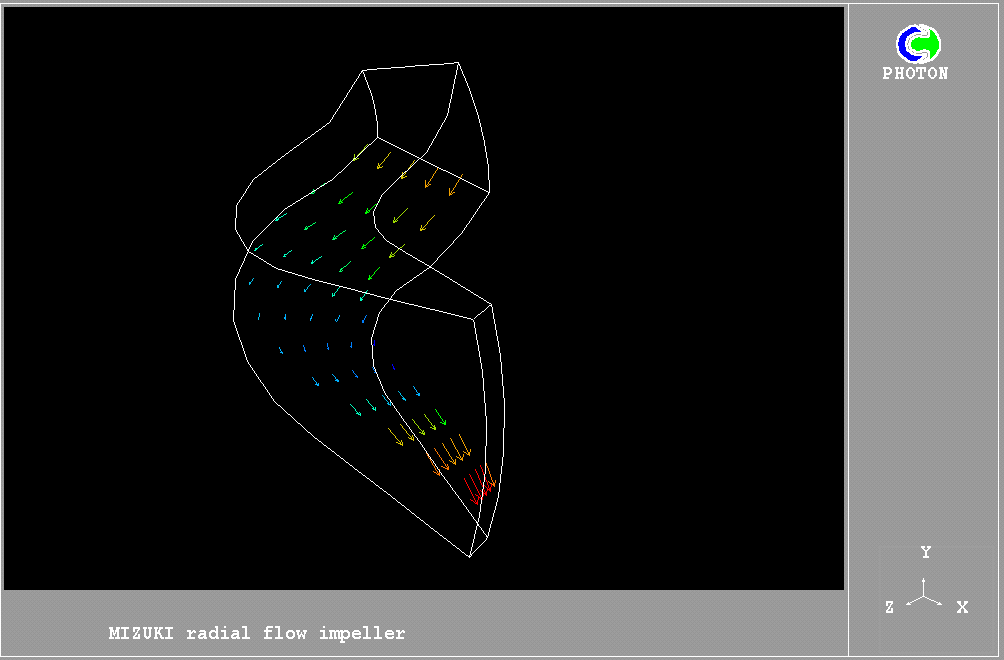
- Plot Vectors.
To plot vectors on the X=2 plane:
- Open the result file - Open a PHI file or (if it already open)
select "Draw/Clear" menu,
- Select "Draw/Vector" menu,
- Press "Add" button,
- Click "X" radio-button in GroupBox "Plane",
- Type "2" in EditBox " PlnNo " (or select with Spin-Button),
- Select "UCRT" in ComboBox "U", "VCRT" - in ComboBox "V" and "WCRT"- in ComboBox "W",
- Press "Add" button,
- Press "Close" button,
- Press "Close" button.
In command mode will enter following commands:
- SET VEC COMP UCRT VCRT WCRT
- VECT X 2 Y 1 5 Z 1 12 SH DASH 0
To plot grid outlines around the vectors:
- Select "File/Open Photon use file" menu,
- Click "Browse" button and select "Tuto1.u03" file in Open file dialog,
- Click "OK" button.
The result of plotting is shown below.
Plot Vectors in Parsol case.
To plot vectors on the X=1 plane:
- Open the result file "PARSOL.PHI" - Open a PHI file or (if it already open)
select "Draw/Clear" menu,
- Select "Draw/Vector" menu,
- Press "Add" button,
- Click "X" radio-button in GroupBox "Plane",
- Select "-" in ComboBox "U", "V1" - in ComboBox "V" and "W1"- in ComboBox "W",
- Press "Add" button,
- Press "Close" button,
- Press "Close" button.
To plot grid outlines around the vectors:
- Select "Draw/Grids" menu,
- Press "Add" button,
- Check "Outline" box,
- Click "X" radio-button in GroupBox "Plane",
- Type "1" in EditBox "PlnNo" (or select with Spin button),
- Press "Add" button,
- Press "Close" button,
- Press "Close" button.
- Select "Draw/Contour" menu,
- Press "Add" button,
- Check "Parsol Boundaries" box,
- Click "X" radio-button in GroupBox "Plane",
- Type "1" in EditBox "PlnNo" (or select with Spin button),
- Press "Add" button,
- Press "Close" button,
- Press "Close" button.
The result of plotting is shown below.
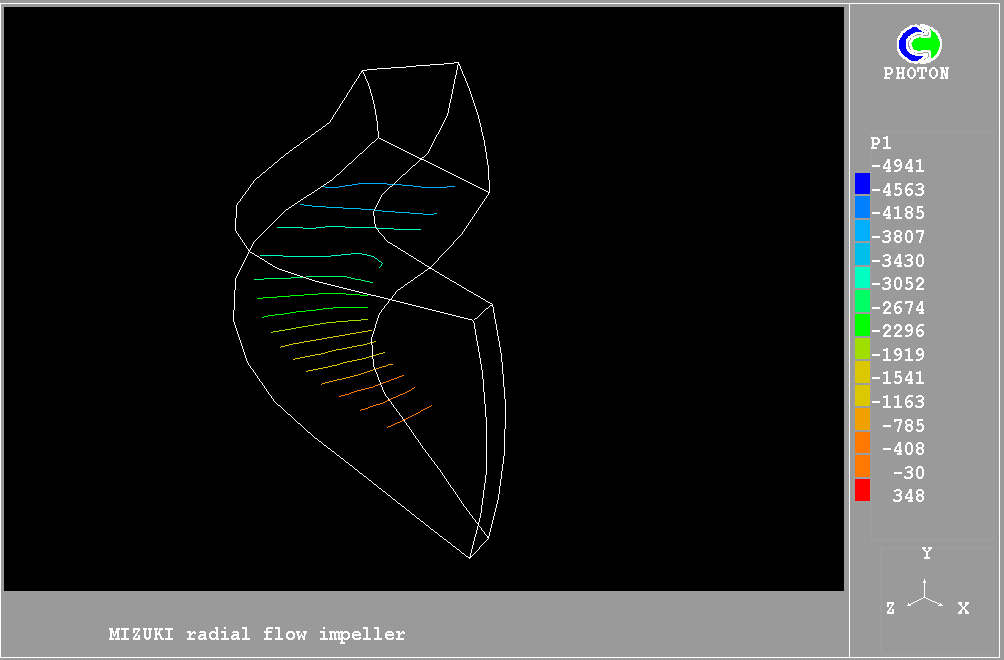
Plot StreamLines.
To plot stream lines:
- Open the result file - Open a PHI file or (if it already open)
select "Draw/Clear" menu,
- Select "Draw/Streamlines" menu,
- Press "Add" button,
- Click "On Circles" radio-button in GroupBox "Init Position",
- Press "Add" button,
- Press "Close" button,
- Press "Close" button.
To plot grid outlines around the stream lines:
- Select "File/Open Photon use file" menu,
- Click "Browse" button and select "Tuto1.u03" file in Open file dialog,
- Click "OK" button.
The result of plotting is shown below.

Select a Plotting Colour.
To plot vectors on the X=2 plane in Blue colour:
- Open the result file - Open a PHI file or (if it already open) select "Draw/Clear" menu,
- Select "Draw/Vector" menu,
- Press "Add" button,
- Click "X" radio-button in GroupBox "Plane",
- Type "2" in EditBox " PlnNo " (or select with Spin-Button),
- Select "UCRT" in ComboBox "U", "VCRT" - in ComboBox "V" and "WCRT"- in ComboBox "W",
- Uncheck "Shade" button,
- Select blue colour in ComboBox " Colour",
- Press "Add" button,
- Press "Close" button,
- Press "Close" button.
In command mode will enter following commands:
- SET VEC COMP UCRT VCRT WCRT
- VECT X 2 Y 1 5 Z 1 12 COL 2 DASH 0
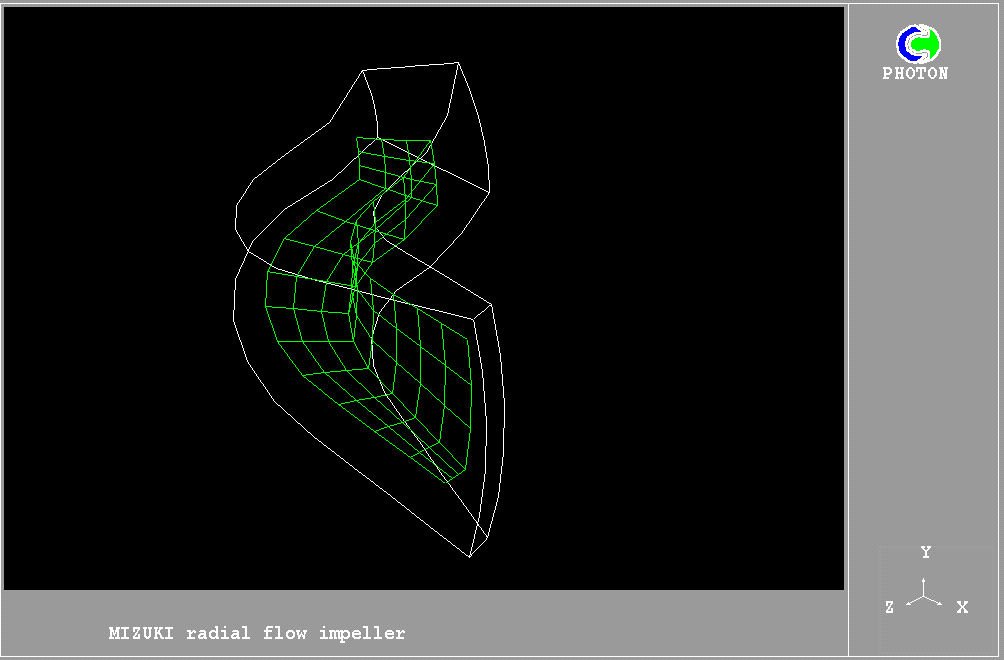
- Set a Plot Region.
Grids, vectors, contours and streamlines can be plotted in a sub-region of the domain. This example shows how to set up such a region and how to plot grids in it.
Open the result file - Open a PHI file or (if it already open) select "Draw/Clear" menu.
To plot grid outlines of the domain:
- Select "File/Open Photon use file" menu,
- Click "Browse" button and select "Tuto1.u03" file in Open file dialog,
- Click "OK" button.
To plot grids in sub-region:
- Select "Draw/Grids" menu,
- Press "Add" button,
- Reset:
XF to 2; XL to 4
YF to 2; YL to 4
ZF to 2; ZL to 11
- Set colour of grid in Green in Combobox "Colour",
- Click "Z" radio-button in GroupBox "Plane",
- Type "2" in EditBox " PlnNo " (or select with Spin-Button),
- Press "Add" button,
- Click "X" radio-button in GroupBox "Plane",
- Type "2" in EditBox " PlnNo " (or select with Spin-Button),
- Press "Add" button,
- Click "Y" radio-button in GroupBox "Plane",
- Type "2" in EditBox " PlnNo " (or select with Spin-Button),
- Press "Add" button,
- Press "Close" button,
- Press "Close" button,
In command mode will enter following commands:
- USE tuto1.u03
- GRID X 2 Z 2 11 Y 2 4 COL 1 DASH 0
- GRID Y 2 Z 2 11 X 2 4 COL 1 DASH 0
- GRID Z 2 X 2 4 Y 2 4 COL 1 DASH 0
The result of plotting is shown below.
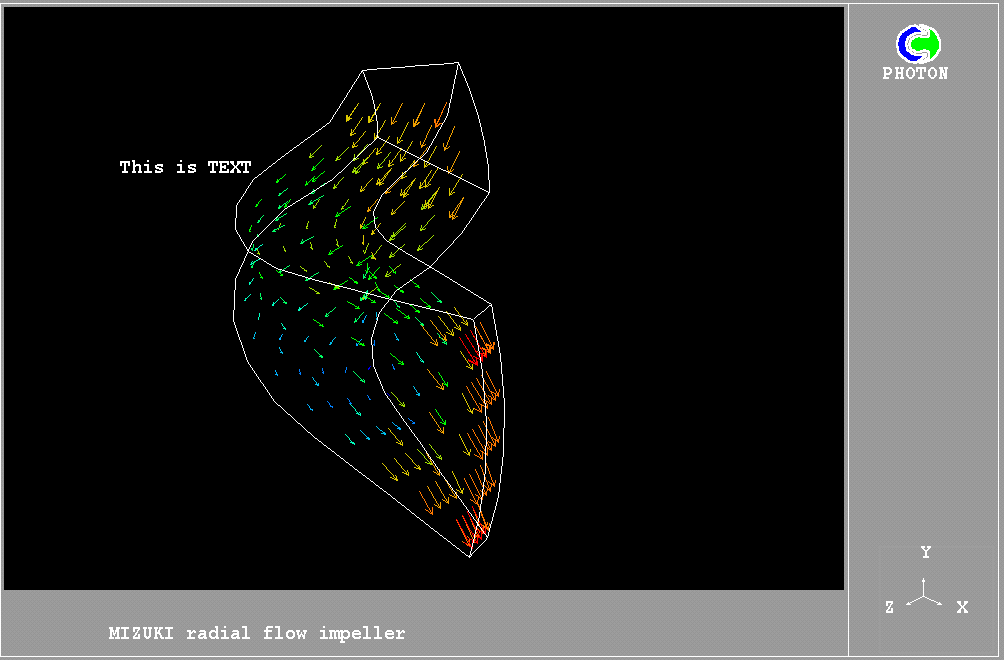
Write Text.
Open the result file - Open a PHI file or (if it already open)
select "Draw/Clear" menu. To create a sample of plot:
- Select "File/Open Photon use file" menu,
- Click "Browse" button and select "Tuto1.u01" file in Open file dialog,
- Click "OK" button.
To write text:
- Select "Draw/Text" menu,
- Press "Add" button,
- Type text "This is TEXT" in EditBox "Text",
- Press buttons in GroupBox "Move" to change the position of the text,
- Use ComboBox "Colors" to change colour of the text,
- Press "Close" button,
- Press "Close" button.
The result of plotting is shown on below.
Changes the orientation of the plot
To change the orientation of the plot, move picture and enlarged/shrunk picture:
- Select "View/View direction" menu,
- Use "UP axes" radio-buttons for set X/Y/Z-axes as the up direction.
- Use "Move" buttons for moving the picture,
- Use "Azimuth" and "Elevation" Sliders for setting the View direction,
- Use "Zoom" EditBox for setting Zoom- factors (enlarged/shrunk picture),
- Press "OK" button for quit.
Use No Smoth contour mode.
To plot contour variable PRPS on the X=1 plane in "No Smoth" mode:
- Open the result file "PARSOL.PHI" - Open a PHI file or (if it already open)
select "Draw/Clear" menu,
- Select "Draw/Contour" menu,
- Press "Add" button,
- Click "X" radio-button in GroupBox "Plane",
- Select "PRPS" in ComboBox "Var",
- Check "No Smoth Fill" box,
- Press "Add" button,
- Press "Close" button,
- Press "Close" button.
To plot vectors on the X=2 plane:
- Select "Draw/Vector" menu,
- Press "Add" button,
- Click "X" radio-button in GroupBox "Plane",
- Select "-" in ComboBox "U", "V1" - in ComboBox "V" and "W1"- in ComboBox "W",
- Press "Add" button,
- Press "Close" button,
- Press "Close" button.
The result of plotting is shown below.
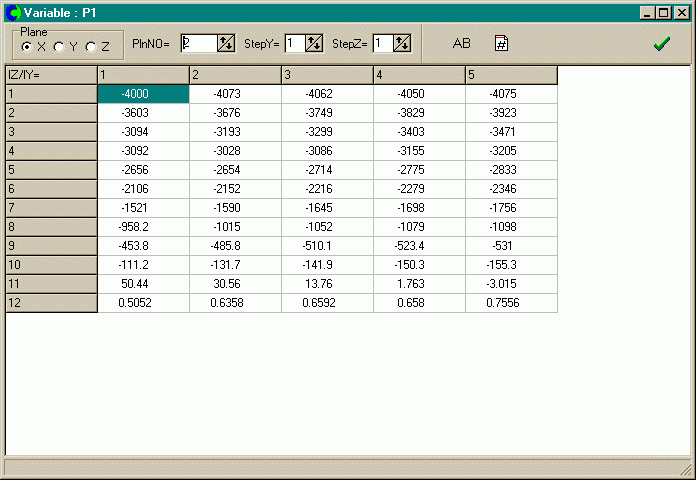
Look of variable values.
To look a pressure values on the plane X=2:
- Open the result file - Open a PHI file,
- Select "Variables/Look of Variable" menu,
- Press "OK" button,
- Select "P1" in ComboBox,
- Press "OK" button,
- Set to "2" PlntNO editbox.
The result is shown below.
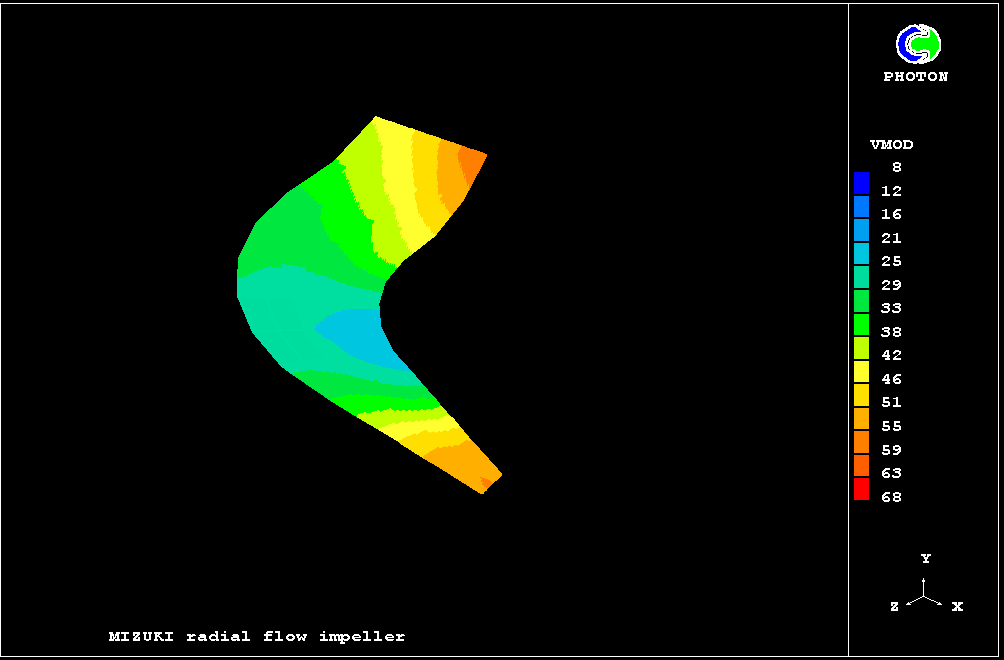
Use calculated field variables.
For calculation a modula of velocity vector :
- Open the result file - Open a PHI file,
- Select "Variables/PHI Variables" menu,
- Press "Add" button,
- Type "VMOD" in the EditBox "Name",
- Type
SQRT((U1^2) + (V1^2) + (W1^2))
in the EditBox "Formula",
- Press "Add" button,
- Press "Close" button.
To plot contour new variable VMOD on the X=2 plane:
- select "Draw/Clear" menu,
- Select "Draw/Contour" menu,
- Press "Add" button,
- Click "X" radio-button in GroupBox "Plane",
- Type "2" in EditBox " PlnNo " (or select with Spin-Button),
- Select "VMOD" in ComboBox "Var",
- Press "Add" button,
- Press "Close" button,
- Press "Close" button.
In command mode will enter following commands:
- ADDVAR VMOD is SQRT((U1^2) + (V1^2) + (W1^2))
- CON VMOD X 2 Y 1 5 Z 1 12 FILL; 2.00E-03
The result of plotting is shown below.