It is important to bear in mind that PHOENICS requires closed three-dimensional solids (closed volumes), or plane two-dimensional surfaces. It cannot make use of open 3D shell objects (e.g. a cube with one face missing).
In AC3D, objects must be composed of single-sided facets, and all the surface normals must point outwards.
If the object represents a fluid channel, it can be very convenient to subtract the object from a box which just encompasses it, using the boolean operations tool, and export the inverse of the object to PHOENICS for use as a solid.
The user is encouraged to launch AC3D and follow these instructions. Use of AC3D is nearly as simple as a basic drawing package such as Corel DRAW, but has a number of extra features that make 3D drawing a possibility.
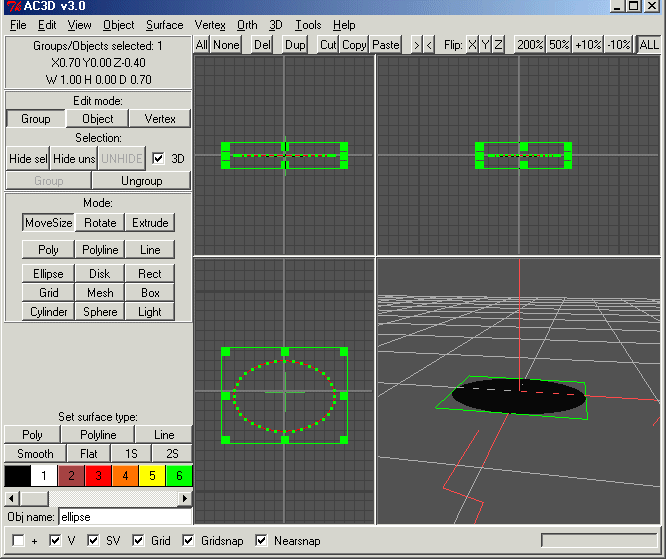
The first view of the AC3D window shows 4 areas (if not then press the button labelled 'All' at the top right). At the left is a tools area; select Ellipse, place the mouse in the lower left area, press the left mouse button and drag out an ellipse. Place the mouse in the lower right window, press the mouse and move it - you should see a 3D representation of the ellipse moving in response to your mouse. The ellipse is surrounded by a green box - this shows that your editing actions will apply to the outlined object. If no object is selected, press the mouse button with the mouse over the edge of the ellipse in the lower left view.
Press the interface button labelled 'Poly' at lower left (beneath the text 'Set surface type'),and the selected ellipse will become solid (if it does not look solid, use the '3D->Wireframe' menu option to change the rendering style). Again use of the mouse in the lower right view will make the ellipse move. Notice that you can see the ellipse from both sides; in PHOENICS a facet is only solid (impermeable to fluid) from one side; press the 1S button at lower left, and the ellipse will only be visible from one side (rotate the ellipse again). the 2S button makes the ellipse visible on both sides again. Generally an object should be rendered in one sided (1S) mode as this shows when the object will be usable in PHOENICS.
In the 3 orthogonal views the ellipse is surrounded by a box with green squares on; drag one of these squares in the lower left window to modify (scale) the ellipse. Click inside the box and drag to move the ellipse - note that the text box at top left shows that the object is selected and updates with the amount of movement that you have made.
Under the text 'Mode' in the left column, about half way up, are 3 buttons - MoveSize, Rotate, Extrude. Select Rotate, and click inside the object box; the object will now rotate (in 5 degree steps - the preferences menu (File->Settings) allows you to choose other step sizes and to set other default properties). Using the mouse in the other views allows rotation about any of the 3 axes.
Select the Extrude option and drag inside the object box to extrude the object (making a cylinder with the cross section of the ellipse). This new object can be moved or rotated in exactly the same way as the ellipse. When Extrude is active, there is a number below the tools which can be used to make the cylinder have more than 1 section (experiment with 3, 4 or 5 to see this effect).
The cross sections of the cylinder can be modified at each set of vertices along the cylinder (use Mode::Vertex and select the vertices then move or scale them).