In this tutorial you will learn about:
At the end of the tutorial you may like to confirm your understanding by the following exercises:
In BFC, as for Cartesian/polar co-ordinates, the geometry is created first, and the mesh is fitted later.
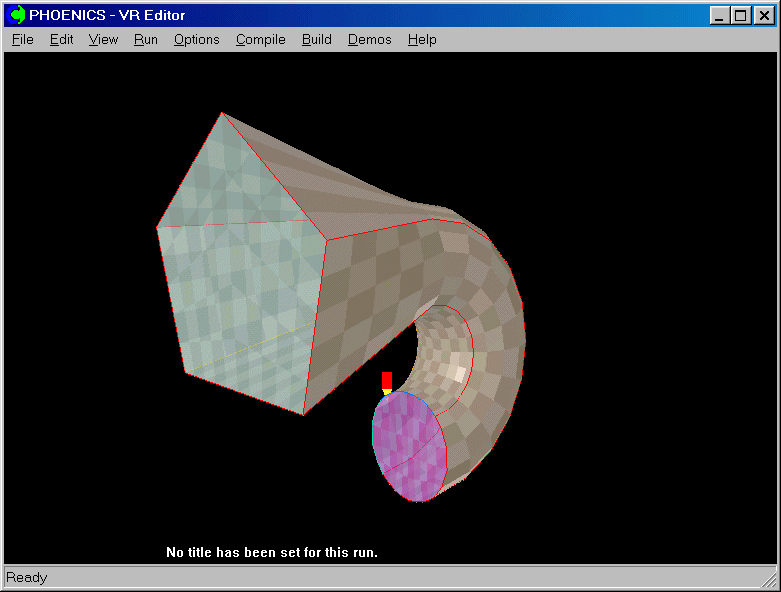
This tutorial deals with the creation of the geometry for a duct, where the cross-section changes from a pentangle to a circle along the length.
The order of the data entity generation and modification is:
This tutorial covers stages 3 & 4.
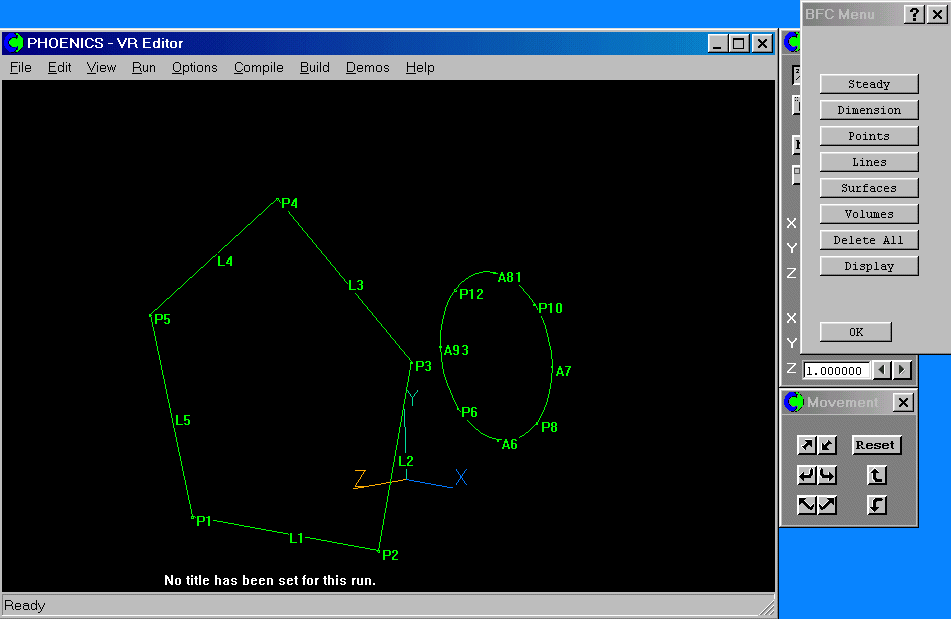
In BFC Tutorial 1, we created the geometry for the pentangle and circle.
We now start the process of meshing by defining the cell distribution along the lines, and then creating surfaces.
From the system level:
To enter the PHOENICS-VR environment, click on the PHOENICS icon on the desktop, or click on Start, programs, PHOENICS, PHOENICS.
From the commander level:
To enter the PHOENICS-VR environment, click on the 'Run vre' icon in the left column.
In PHOENICS-VR environment,
Start with Library case B111 - click on 'File' then on 'Load from libraries'. Type B111 into the Case Number box, then click OK.
To enter VR Editor:
This is the default mode of operation.
Activate the Grid Generator by clicking on the Grid mesh toggle on the hand-set ![]() , then clicking anywhere within the domain to bring up the BFC menu dialog.
The grid generator screen is shown below:
, then clicking anywhere within the domain to bring up the BFC menu dialog.
The grid generator screen is shown below:
If you are continuing BFC Tutorial 1, you will join Tutorial 2 here.
PHOENICS requires a structured mesh, and this has to be considered when setting the cell numbers.
This means that the number of cells on opposite sides of a frame must match.
The grid directions are known as I, J and K.
There is no link between these, and the Cartesian axes X Y & Z used for geometry definition.
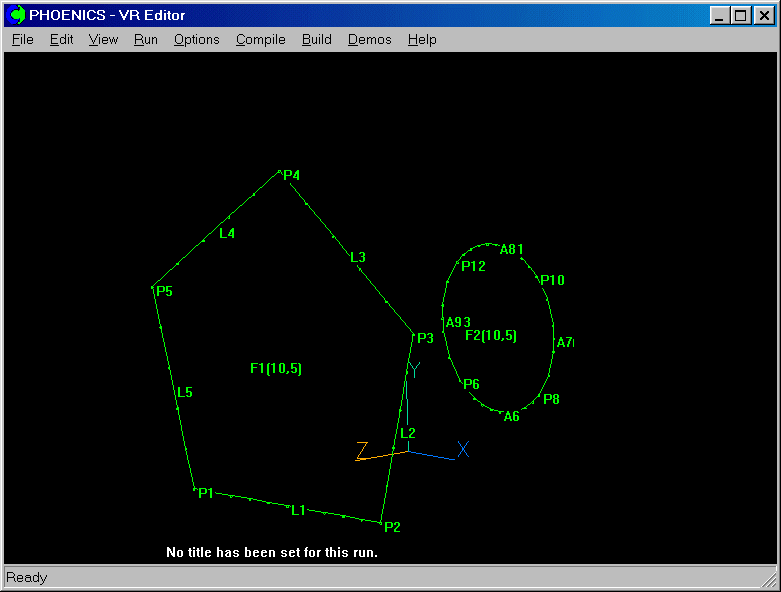
Surfaces are made up of frames. A frame is a four-sided element, which may however be made up from more than four lines. The pentangle at z=1 will be one frame. Its corners will be points P1, P2, P3 and P5. The circle at z=0 will be another frame, with corners P6, P8, P10 and P12.
It is up to you to decide how to align the frame edges with the I/J/K grid directions.
The number of cells on each line can now be specified, bearing in mind the requirement for a structured mesh.
Click on the 'Lines' button, then 'Modify lines' . Point to line A6 (the bottom arc),
and click.
When the line is selected, a sub-menu is displayed that allows the number and distribution
of cells along the line to be modified. The selected line is shown in red and named in the
top line of the table.
Enter the new number of cells - 10 for line A6.
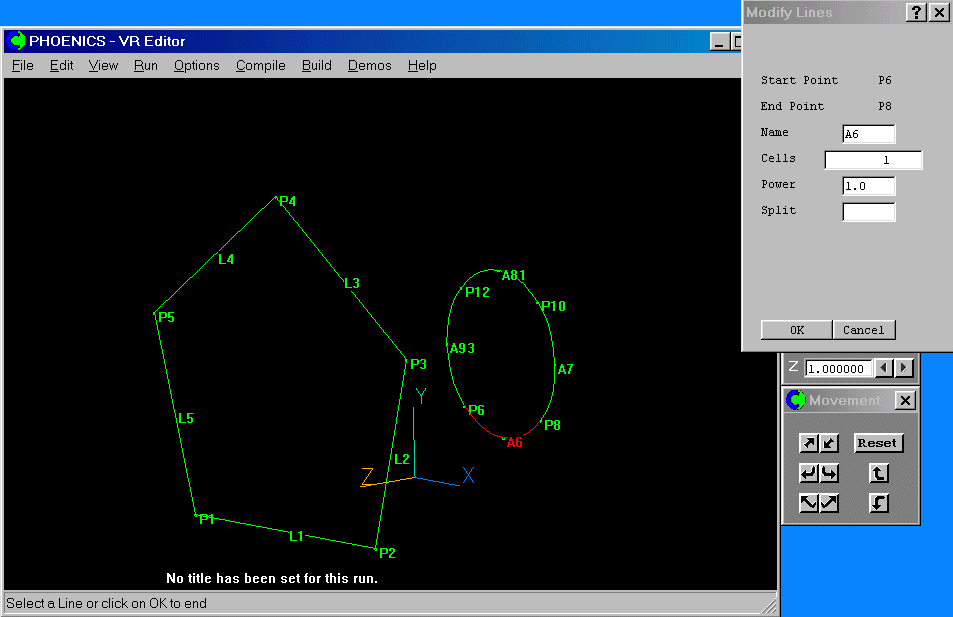
When you click 'Ok' the line is re-defined and the dialog is erased.
The line alteration menu is active until another function is selected, allowing the modification of many lines one after another.
At this stage in the mesh generation, we have to choose cell distributions on each line to maintain a structured mesh when the frames are defined. Therefore if we specified 10 cells on arc A6, we MUST specify 10 cells on arc A8,because these will become opposite sides of a frame.
These will become the 'I' cells.
Similarly, the specification of 5 cells on arc A7 will require the specification of 5 cells on arc A9.
These will become the J cells.
By clicking on lines A7, A8 and A9, set the number of cells as follows:
| Line name | Number of cells |
| A6 | 10 |
| A7 | 5 |
| A8 | 10 |
| A9 | 5 |
Therefore, on the z=0 plane, we have specified a 10 by 5 mesh. To maintain a structured mesh, we have to also specify a 10 by 5 mesh on the z=1 plane.
This requires the selection of the lines to modify, and furthermore, the mesh must be specified in a suitable orientation.
For this case, we will keep 10 cells in 'I' in line L1, and take 5 cells in lines L3 and L4 across the top of the duct.
By clicking on lines L1, L2, L3, L4 and L5, set the number of cells as follows:
| Line name | Number of cells |
| L1 | 10 |
| L2 | 5 |
| L3 | 5 |
| L4 | 5 |
| L5 | 5 |
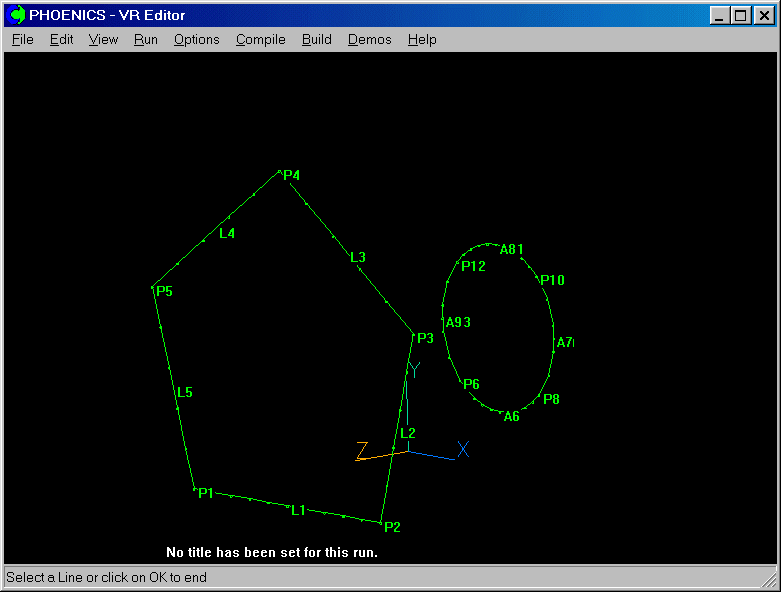
The screen should now look like this:
We can now generate the surfaces. Surfaces are composed of Frames. Frames are generated by using the 'Surfaces', 'New Frames' option. To generate a frame, each point around the frame edge must be selected in turn. The points must be joined by lines.
The direction of selection is immaterial, as long as a CORNER is selected first. Each valid selection will be indicated by the point and connecting lines changing colour to red.
We start by generating the frame at z=1 (the pentangle). Click on points P1, P2, P3, P4 and P5 in order, then on P1 again to close the frame.
When the first point is re-specified to close the frame, the point changes colour to light blue. This is to allow the specification of the remaining corner points ensuring correct mesh orientation.
The corner points are P1, P2, P3 and P5. Click on P2, P3 and P5. P4 is merely an intermediate point.
When the fourth corner point is selected, the frame is created.
A valid frame is shown by the name F1(n,m). (n,m) show the number of cells on opposing
edges. The numbers in the brackets are positive when the frame is correct. If either
number is negative, an error is present in the frame - usually the number of cells on
opposing faces does not match. The negative number indicates the difference in cell
numbers.
Now make the frame on z=0 (the circle). Click on P6, P8, P10, P12 and P6 again to close
the frame.
Note, when only four lines make up a frame, the corner points are automatically known and the frame is generated without further input.
The frames for the duct have now been defined. The next tutorial shows how a mesh is fitted to the frames.
If you want to proceed directly to the next tutorial, click here.
To summarise, in this Tutorial you have learned how to:
We now suggest you practice each of these functions 'live' for yourself with the following exercises:
To leave the BFC Menu, click 'OK'. To save the work so far, click on 'File', 'Save as a case', make a new folder called 'BFC ' (e.g.), and save as 'BFC2'.
Note that at this point no mesh has been created, so the VR-Editor will still show the default cube!