The case below exemplifies how the Simple Chemical Reaction Scheme can be applied to a combustion chamber. The flow is turbulent and the reaction-rate is physically controlled by means of the Eddy-Breakup Model.
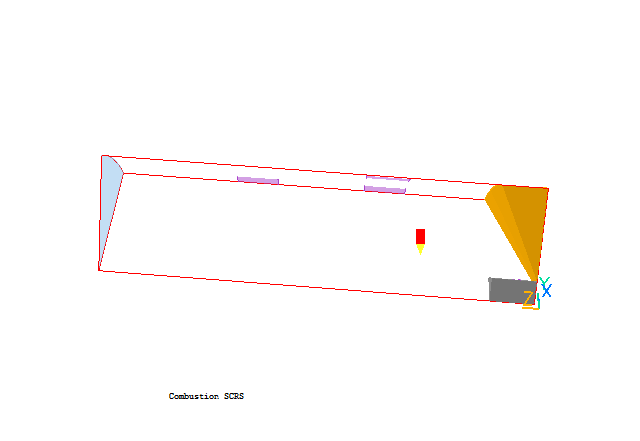
The geometry is shown below:

The combustion chamber has an inlet (not visible) for the premixed fuel-oxygen which lies at the top of the dark-grey blockage at the lower right corner; two secondary oxygen inlets (purple colour) on the right and a dilution inlet (purple colour) on the left. There is a blocked region (orange colour on the far right) near the fuel-oxygen inlet and the outlet is on the far left.
The following input data are used for this case:
A complete step-by-step guide, showing how to set the case from the default mode of operation, is provided.
From the system level:
To enter the PHOENICS-VR environment, click on the PHOENICS icon on the desktop, or click on Start, programs, PHOENICS, PHOENICS.
From the commander level:
To enter the PHOENICS-VR environment, click on the 'Run vre' icon in the left column.
In PHOENICS-VR environment,
Start with an 'empty' case - click on 'File' then on 'Start New Case', then on 'Core'', then click on 'OK'; to confirm the resetting.
To enter VR Editor:
This is the default mode of operation.
Set the domain size:
Click on 'Menu' (Main Menu) on the VE-Editor panel;
Set 'Combustion SCRS' as the Title;
Click on 'Geometry'.
Click on 'Cartesian' under co-ordinate system; and select 'Cylindrical-polar' and then on 'OK'.
Leave 'Inner radius' at 0.0 and 'tolerance' at 1.e-3.
Change the x-domain size to 0.628 radians.
Change the y-domain size to 0.065 m.
Change the z-domain size to 0.245 m.
Click on 'OK' to close the Grid mesh settings dialog.
Click on 'OK' to exit from 'Menu'.
Click on 'Reset' button on the movement panel.
Click on 'Fit to Window'
Use the mouse to position the Y-direction of the coordinate upright and Z-direction pointing to the left.
Activate solution of the required variables and models
Click on 'Menu'; and the on 'Models'.
Click on ENERGY EQUATION; and then choose ENTHALPY and toggle STATIC to TOTAL.
Click on 'Turbulence models' and choose the KEMODL.
Click on COMBUSTION and choose 3_GASES_KINETIC.
If "settings" for 3_GASES_KINETIC model is clicked, a sub-panel appears that shows the following model settings:
- Stoichiometric ratio: 17.24
- Heat of Combustion: 4.9E7 J/kg
- Specific heats and Molecular weights for Fuel, Oxidant and Product
- Reaction Type: Kinetically-controlled
- Reaction source: Eddy_breakup
Specify properties
Click on 'Properties'.
Turn 'Use property table' to OFF. The density will be automatically set to 3_GASES.
Turn (Density) 'Storage' to ON
Check that 'Temperature' should now be 3_GASES-KINETIC and 'Specific Heat' is 3_GASES.
Click 'Page down' and continue the settings.
Change 'Reference Pres (Pa) to 8E5 and Reference Temp(K) to 0.0.
Click 'Page up'.
Set Initial values
Click on 'Initialisation'.
Set the following initial (FIINIT) values
- 10.0 m/s for W1
- 11.25 m2/s2 for KE
- 353.0 m2/s3 for EP
- 11595 J/kg for H1
- 3.6 kg/m3 for DEN1
- 0.0548 for FUEL
- 0.0548 for MIXF
Enter numerical settings
Click on 'Numerics'.
Set 'Total number of iterations' to 150.
Click on 'Limits on variables'
Change VARMAX of P1 to 1E5 and VARMAX of DEN1 to 4.0
Change VARMIN of TMP1 to 273 and VARMIN of H1 to 1.0
Click 'Previous panel'
Click on 'Top menu' and then on 'OK' to exit from 'Menu'.
Create the objects making up the scene
Click on the 'Object Management' button (O on the toolbar or
on the hand set). This will display a (currently empty apart from the domain) list of objects.
Create Blockages for combustion chamber
Click on 'Object', 'New' and 'New Object', 'Blockage'. This will bring up the object specification dialog box.
Change name to CMP1.
Click on 'Size' and set SIZE of the object as:
Xsize: 'To end'
Ysize: 0.013
Zsize: 0.025
Click 'OK' to exit from the Object specification Dialogue Box.
Click on 'Object', 'New' and 'New Object', 'Blockage'.
Change name to CMP2.
Click on 'Shape'
Find POLWE2 in the subdirectory public/shapes; and then select and click on 'Open'
Click on 'Size' and set SIZE of the object as:
Xsize: 'To end'
Ysize: 'To end'
Zsize: 0.025
Click on 'Place' and set POSITION of the object as:
Xpos: 0
Ypos: 0.013
Zpos: 0
Click 'OK' to exit from the Object specification Dialogue Box.
Create the Fuel Inlet
Click on 'Object', 'New' and 'New Object', 'Inlet', and select the Y plane for the inlet to lie in.
Change name to INLET.
Click on 'Size' and set Size of the object as:
Xsize: 'To end'
Ysize: 0
Zsize: 0.004
Click on 'Place' and set POSITION of the object as:
Xpos: 0
Ypos: 0.013
Zpos: 0.009
Click on 'General'.
Click on 'Attributes'
Toggle Inlet density to User-set and then set density to 3.606 and temperature 773K
Click on 'Gas composition' and set FUEL to 0.0548; Oxidant to 0.9452
Click on 'Apply' and 'OK'
Set velocity in Y-direction at 100 m/s.
Toggle 'Object side' to High
Click on 'OK' twice to exit from the Object Specification Dialogue Box.
Create the secondary air inlets
Click on 'Object', 'New' and 'New Object', 'Inlet', and select the Y plane for the inlet to lie in.
Change name to SIN1.
Click on 'Size' and set Size of the object as:
Xsize: 0.10
Ysize: 0
Zsize: 0.0245
Click on 'Place' and set POSITION of the object as:
Xpos: 0
Ypos: 'At end'
Zpos: 0.0735
Click on 'General'.
Click on 'Attributes'.
Set Temperature at 773K.
Set velocity in Y-direction at -40. m/s
Click on 'OK' and check the position and size again.
Click on 'OK' to exit from the Object Dialogue Box.
Click on 'Object', 'New' and 'New Object', 'Inlet', and select the Y plane for the inlet to lie in.
Change name to SIN2.
Click on 'Size' and set Size of the object as:
Xsize: 0.1
Ysize: 0
Zsize: 0.0245
Click on 'Place' and set POSITION of the object as:
Xpos: 0.314
Ypos: 'At end'
Zpos: 0.0735
Click on 'General'.
Click on 'Attributes'.
Set Temperature at 773K and click 'OK'
Set velocity in Y-direction at -40. m/s
Click on 'OK' and check the position and size again
Click on 'OK' to exit from the Object Dialogue Box.
Create the dilute air inlet
Click on 'Object', 'New' and 'New Object', 'Inlet', and select the Y plane for the inlet to lie in.
Change name to DIN.
Click on 'Size' and set Size of the object as:
Xsize: 0.1
Ysize: 0
Zsize: 0.0245
Click on 'Place' and set POSITION of the object as:
Xpos: 0.0
Ypos: 'At end'
Zpos: 0.15
Click on 'General'.
Click on 'Attributes'.
Set Temperature at 773K and click 'OK'
Set velocity in Y-direction at -40. m/s
Click on 'OK' and check the position and size again.
Click on 'OK' to exit from the Object Dialogue Box.
Create the outlet
Click on 'Object', 'New' and 'New Object', 'Outlet', and select the Z plane for the outlet to lie in.
Change name to Outlet.
Click on 'Size' and set Size of the object as:
Xsize: 'To end'
Ysize: 'To end'
Zsize: 0.0
Click on 'Place' and set POSITION of the object as:
Xpos: 0.0
Ypos: 0.0
Zpos: 'At end'
Click on 'General'.
Click on 'Attributes' and then change coefficient to 1.0.
Click on 'OK' twice to exit from the Object Specification Dialogue Box.
Set the grid:
Click on the 'Mesh toggle' button. The default mesh will appear on the screen.
The orange lines are region lines,and denote the edges of the bounding boxes of each object. The blue lines are ordinary grid lines introduced by the auto-mesher.
Click anywhere on the image, and the 'Gridmesh settings' dialog box will appear.
The grid in all three directions is set to 'Auto'. For this case it gives approximately 26 cells in X, 38 in Y and 63 in Z. This is somewhat too fine for the tutorial, as the case will take too long to run.
Click 'Edit all regions in' 'X direction'. Set 'Autogrid settings' to 'Off'. The settings for each region are now live, but set to the automesh values.
Click' 'Free all' to undo the fixing, then enter 15 for 'Number of cells' and click 'OK'.
Click 'Edit all regions in' 'Y direction'. Following the same steps as for X, set the 'Number of cells' to 15 then click 'OK'.
Click 'Edit all regions in' 'Z direction'. Following the same steps as for X, set the 'Number of cells' to 35 and click 'Apply'. Using the '<' button scroll the region list until you can see regions 1,2 and 3. Set the number of cells in each to 3. Click 'OK'.
Click on 'OK' to exit from the Gridmesh settings dialog
The final mesh should look like this:
Click the 'Mesh toggle' again to turn the mesh display off.
Set the remaining solution-control parameters:
Click on 'Main Menu' and then on 'Numerics'.
The default number of iterations is 100. This is enough to test if a model is set up correctly, but is hardly ever enough to obtain a converged solution.
Reset the total number of iterations to 500.
In the PHOENICS-VR environment, click on 'Run', 'Solver'(Earth), and click on 'OK'; to confirm running Earth.
In the PHOENICS-VR environment, click on 'Run', 'Post processor',then GUI Post processor (VR Viewer) Viewer)'. Click 'OK' on the file names dialog to accept the default files.
To view:
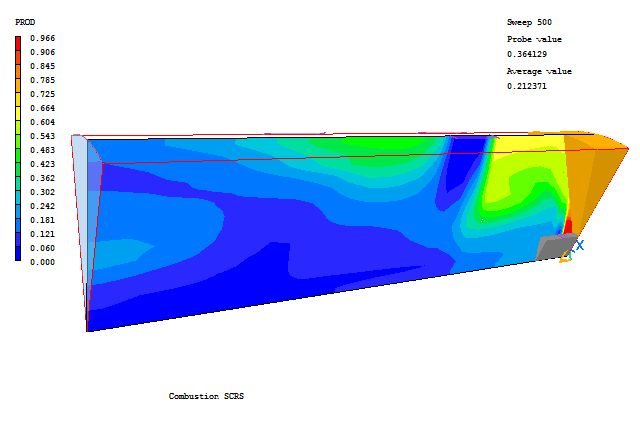
The image below shows the product (PROD) mass-fraction distribution.

To select the plotting variable:
To change the direction of the plotting plane, set the slice direction to X, Y or Z ![]()
To change the position of the plotting plane, move the probe using the probe position buttons
 .
.
In the PHOENICS-VR environment, click on 'Save as a case', make a new folder called 'COMBUST', select the new folder, and save as 'SCRS'.