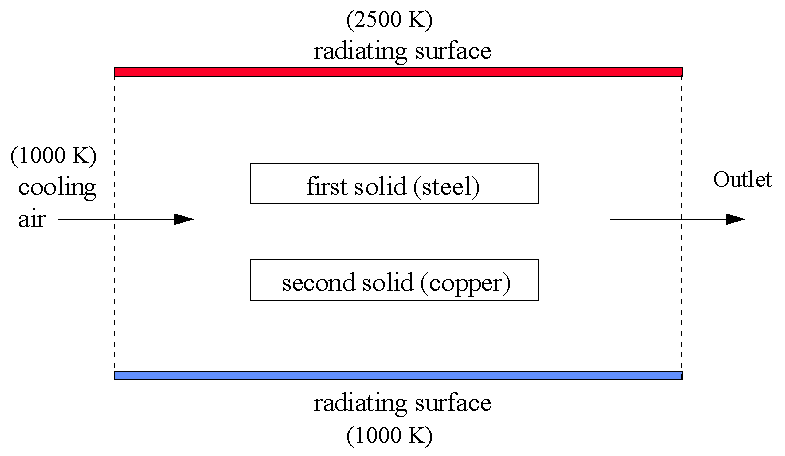
This workshop calculates the heat exchange in a duct flow with fixed wall temperatures. Two solid plates of different materials are placed in the duct.
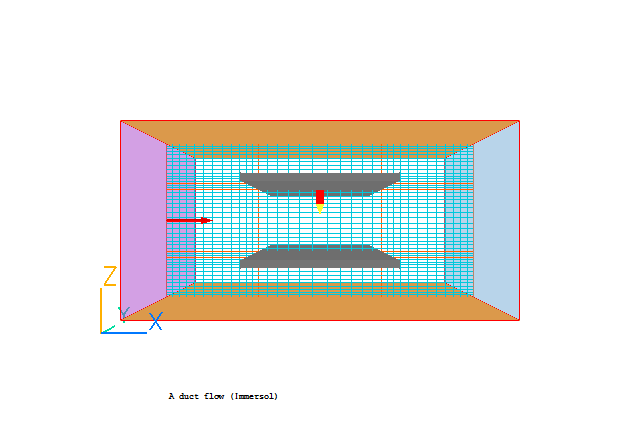
The flow domain is shown below:-
From the system level:
To enter the PHOENICS-VR environment, click on the PHOENICS icon on the desktop, or click on Start, programs, PHOENICS, PHOENICS.
From the commander level:
To enter the PHOENICS-VR environment, click on the 'Run vre' icon in the left column.
In PHOENICS-VR environment,
Start with an ‘empty’ case - click on 'File' then on 'Start New Case', then on 'Core'’, then click on 'OK'; to confirm the resetting.
To enter VR Editor:
This is the default mode of operation .
Set the domain size, and activate solution of the required variables:
Click on ‘Main menu’
Click on ‘Geometry’
Change the domain size under z-direction to 0.5 m
Click on 'OK' to close the Grid mesh settings dialog
Click on ‘Models’ and turn ‘Solution for velocities and pressure’ to ON
Click Energy Equation to ON, select Temperature and click on OK
Click Radiation models to ON and select IMMERSOL. Click on OK
Click on IMMERSOL settings and:-
Enter 1.0 for the Absorption coefficient
Enter 0.0 for the Scattering coefficient
Switch the ‘Store of radiative energy fluxes’ to ON
Click on ‘Previous panel’
Set material properties for the fluid
Click on ‘Properties’. Click on domain material dialogue box/Gases/OK/2 Air using Ideal Gas Law, STP/OK
Click on Top menu/OK
Click 'Reset' on the Movement control panel, then 'Fit to window' to re-scale the view to fit the geometry.
Create INLET object
Click on ‘New Object’, 'Inlet'. Select the X plane for the inlet to lie in.
Change Name to Inlet
Change the following to:
XPos: 0.0 XSize: 0.0
YPos: 0.0 YSize: 'To end'
ZPos: 0.0 ZSize: 'To end'
Click on 'General' then 'Attributes' and enter 727 °C for the Temperature, 1.0 m/s for the x- direction velocity. Change the inlet turbulence to 'User-set', and leave the default inlet values. Click on OK/OK
Create OUTLET object
Click on ‘New Object’, 'Outlet'. Select the X plane for the outlet to lie in.
Change Name to Outlet
Change the following to:
XPos: 'At end' XSize: 0.0
YPos: 0.0 YSize: 'To end'
ZPos: 0.0 ZSize: 'To end'
Click on General, Attributes and change Temperature to 727 °°C
Click on OK/OK
Create Lower WALL object
Click on ‘New Object’, 'Plate'. Select the Z plane for the plate to lie in.
Change Name to Walll
Change the following to:
XPos: 0.0 XSize: 'To end'
YPos: 0.0 YSize: 'To end'
ZPos: 0.0 ZSize: 0.0
Click on General, Attributes.
Click on 'Adiabatic', and select 'Surface temperature', 'OK'. Set the surface temperature value to 727.
Set the emissivity to 0.9.
Click on OK/OK
Create upper WALL object by duplication from lower wall
Click on the Duplicate object button. Click on the object
Change the name to Wallh.
Change ZPos to 'At end'
Click on General, Attributes, and set the surface temperature to 2227.
Click on OK/OK
Create upper internal blockage
Click on ‘New Object’, 'Blockage'. Change Name to PLT1
Change the following to:
XPos: 0.3 XSize: 0.4
YPos: 0.0 YSize: 1.0
ZPos: 0.35 ZSize: 0.02
Click on General, Attributes.
Click on the Types dialogue box/Solids/OK
Choose ‘111 STEEL at 27 deg C’/OK
Set emissivity to 0.9
Click on OK/OK
Create lower internal blockage by duplication from upper
Click on Duplicate object button and on the object which appears at the origin
Change Name to PLT2
Change the following to:
XPos: 0.3 ZPos: 0.13
Click on General, Attributes.
Click on the Material dialogue box
Choose ‘103 COPPER at 27 deg C’/OK/OK
Set the grid:
Click on the 'Mesh toggle' button. The default mesh will appear on the screen.
The orange lines are region lines,and denote the edges of the bounding boxes of each object. The blue lines are ordinary grid lines introduced by the auto-mesher.
Click anywhere on the image, and the 'Gridmesh settings' dialog box will appear.
The grid in all three directions is set to 'Auto'. For this case it gives approximately 35 cells in X, 1 in Y and 47 in Z. This will suffice for the tutorial, though they would not be enough for a 'real' calculation.
Click on 'OK' to exit from the Gridmesh settings dialog, and click the 'Mesh toggle' again to turn the mesh display off.
Set remaining solution control parameters
Click on 'Main Menu'
Click on ‘Numerics’
Change ‘Total number of iterations to 500
Click on Top Menu/OK
Adjust the Monitoring Position to the center of the domain using the Z Position button.
Running the Solver.
In the PHOENICS-VR environment, click on 'Run', 'Solver' then 'Local solver(Earth)', and click on 'OK' to confirm running Earth.
Using the VR Viewer.
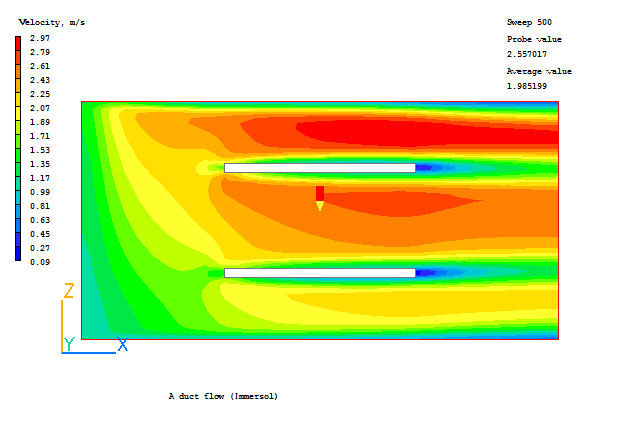
In the PHOENICS-VR environment, click on 'Run', 'Post processor',then GUI Post processor (VR Viewer) Viewer)', and view the velocity vectors, contours and isosurfaces. (Hint – change the Slice direction to Y)
Saving the results.
In the PHOENICS-VR environment, click on 'Save as a case', make a new folder called 'IMMERSOL ' (e.g.) and save as 'CASE1' (e.g.).