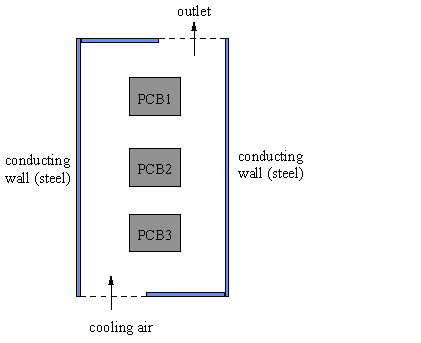
This workshop calculates the heat exchange in an electronic box which has three printed circuit boards (PCBs) within the domain. They each radiate 50 W to the surroundings. The walls of the box are made of heat-conducting material.
The flow domain is shown below:-
From the system level:
To enter the PHOENICS-VR environment, click on the PHOENICS icon on the desktop, or click on Start, programs, PHOENICS, PHOENICS.
From the commander level:
To enter the PHOENICS-VR environment, click on the 'Run vre' icon in the left column.
In PHOENICS-VR environment,
Start with an ‘empty’ case - click on 'File' then on 'Start New Case', then on 'Core', then click on 'OK'; to confirm the resetting.
To enter VR Editor:
This is the default mode of operation .
Set the domain size, activate solution of variables and set physical properties
Click on ‘Main menu’
Click on ‘Geometry’
Change the domain size under x-direction to 0.5 m
Click on 'OK' to close the Grid mesh settings dialog
Click on Models, then Energy Equation dialogue box, select Temperature and click on OK
Click on Radiation models dialogue box and select IMMERSOL. Click on OK
Click on IMMERSOL settings and:-
Enter 1.0 for the Absorption coefficient
Enter 0.0 for the Scattering coefficient
Switch the ‘Store of radiative energy fluxes’ to ON
Click on ‘Previous panel’
Click on ‘Properties’.
Click on Domain material box/Gases/OK/2 Air using Ideal Gas Law, STP/OK.
Click on Top menu/OK
Click 'Reset' on the Movement control panel, then 'Fit to window' to re-scale the view to fit the geometry.
Create the objects making up the scene
Click on the 'Object Management' button (O on the toolbar or
on the hand set). This will display a (currently empty apart from the domain) list of objects.
Create INLET object
Click on 'Object', 'New', 'New Object', 'Inlet'. Select the Z plane for the inlet to lie in.
Change Name to Inlet
Change the following to:
XPos: 0.0 XSize: 0.2
YPos: 0.0 YSize: 'To end'
ZPos: 0.0 ZSize: 0.0
Click on General, Attributes and leave 20 °C for the Temperature. When set to 'Ambient', the external temperature at all inlet and outlet objects can be reset from Main menu, properties.
Set 0.5 m/s for the z- direction velocity. Click on OK/OK.
Create OUTLET object
Click on 'Object', 'New', 'New Object', 'Outlet'. Select the Z plane for the outlet to lie in.
Change Name to Outlet
Change the following to:
XPos: 0.3 XSize: 'To end'
YPos: 0.0 YSize: 'To end'
ZPos: 'At end' ZSize: 0.0
Click on OK/OK.
Create left wall, WWALL
Click on 'Object', 'New', 'New Object', 'Blockage'.
Change Name to Wwall
Change the following to:
XPos: 0.0 XSize: 0.002
YPos: 0.0 YSize: 'To end'
ZPos: 0.0 ZSize: 'To end'
Click on General, Attributes. Click on the Types dialogue box/Solids/OK
Choose ‘111 STEEL at 27 deg C’/OK
Set emissivity to 0.9.
Click on OK/OK.
Create right wall, EWALL, by duplication from WWALL
Click on 'Object', 'Copy object', 'OK'.
Double-Click on the copied object in the list.
Change Name to Ewall
Change Xpos to 'At end'.
Create the top wall, HWALL
Click on 'Object', 'New', 'New Object', 'Blockage'.
Change Name to Hwall.
Change the following to:
XPos: 0.0 XSize: 0.3
YPos: 0.0 YSize: 'To end'
ZPos: 'At end' ZSize: 0.002
Click on General, Attributes.
Click on the Types dialogue box/Solids/OK
Choose ‘111 STEEL at 27 deg C’/OK
Set the emissivity to 0.9
Click on OK/OK.
Create the lower wall, LWALL, by duplication from HWALL
Click on Object, 'Copy object', 'OK'. Click on the new object which appears at the bottom of the list (object HWALL_6). Change Name to Swall.
Change the following to:
XPos: 0.2
ZPos: 0.0
Click on OK.
Create bottom pcb, PCB3
Click on 'Object', 'New', 'New object', 'PCB'.
Change Name to PCB3 (which stands for Printed Circuit Board 3).
Change the following to:
XPos: 0.2 XSize: 0.1
YPos: 0.0 YSize: 'To end'
ZPos: 0.15 ZSize: 0.1
Click on Attributes, then Adiabatic, select Fixed heat Flux, and click OK. Set the heat source to 50.0 W.
Set the emissivity to 0.8.
Click on OK/OK.
Create the remaining PCB objects by Arraying the first
Click on 'Object', 'Array object(s)'.
Change the following to:
Dimension Pitch X 1 0.0 Y 1 0.0 Z 3 0.3
Click on OK.
Click on Top Object twice and change Name to PCB1.
Click on OK.
Click on Middle Object twice and change Name to PCB2.
Click on OK.
Set the grid:
Click on the 'Mesh toggle' button. The default mesh will appear on the screen.
The orange lines are region lines,and denote the edges of the bounding boxes of each object. The blue lines are ordinary grid lines introduced by the auto-mesher.
Click anywhere on the image, and the 'Gridmesh settings' dialog box will appear.
The grid in all three directions is set to 'Auto'. For this case it gives approximately 62 cells in X, 1 in Y and 74 in Z. This will suffice for the tutorial, though they would not be enough for a 'real' calculation.
Click on 'OK' to exit from the Gridmesh settings dialog, and click the 'Mesh toggle' again to turn the mesh display off.
Set remaining solution control parameters
Click on ‘Main menu’.
Click on ‘Numerics’
Change ‘Total number of iterations to 1000.
Click on ‘Output’. Change monitor point to:
XMON=0.4 YMON=0.5 ZMON=0.9 (a point near the outlet).
Click on Top menu/OK.
In the PHOENICS-VR environment, click on 'Run', 'Solver' then 'Local solver (Earth)', and click on 'OK'; to confirm running Earth.
In the PHOENICS-VR environment, click on 'Run', 'Post processor',then GUI Post processor (VR Viewer) . Click 'OK' on the file names dialog to accept the default files.
To view:
To select the plotting variable:
To change the direction of the plotting plane, set the slice direction to X, Y or Z ![]()
To change the position of the plotting plane, move the probe using the probe position buttons
 .
.
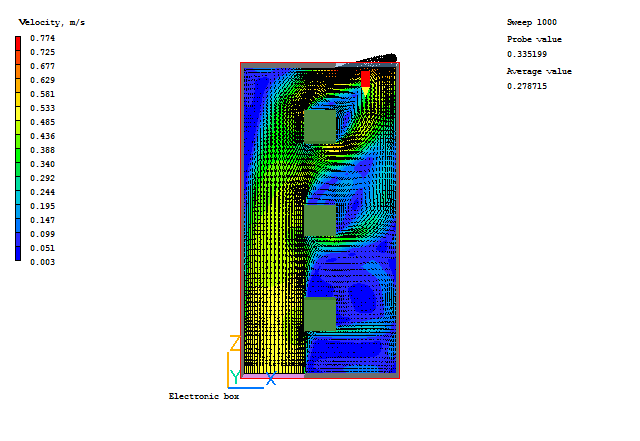
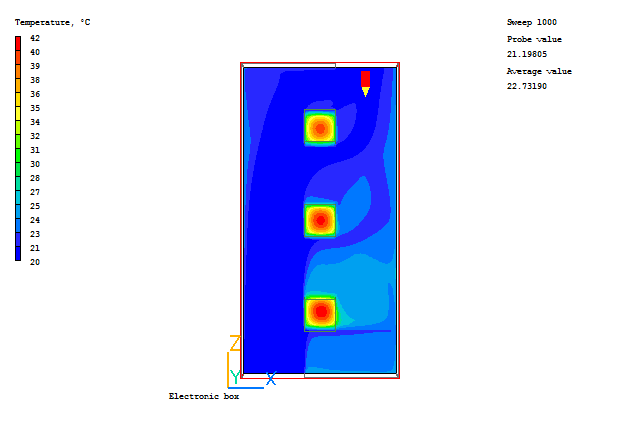
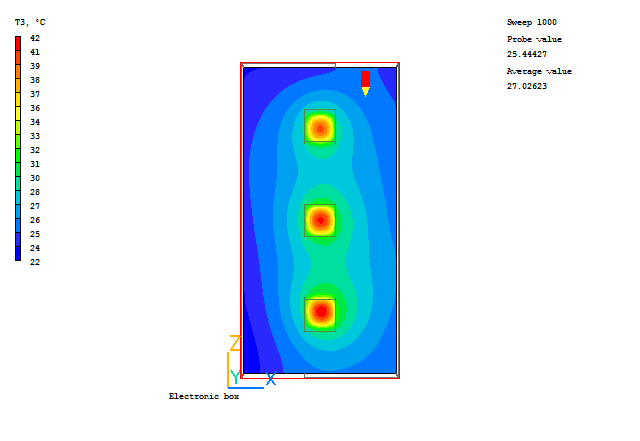
Typical plots from this case are:
In the PHOENICS-VR environment, click on 'Save as a case', make a new folder called 'IMMERSOL' (e.g.) and save as 'CASE1' (e.g.).
Do the external walls heat up?
What happens if the absorption coefficient of the fluid is changed to 0.0?
To do this, click on Menu, Models, then Settings next to Immersol.
You will also have to increase relaxation on the temperature equation to obtain convergence. Click on Numerics, and increase the total number of iterations to 1500. Click on Relaxation control, then click the > arrow until T3 and TEM1 are visible. Set the MAXINC to 5 (the maximum change from iteration to iteration).
Run Earth, and inspect the results with the Viewer. Save the results as CASE2 in the IMMERSOL folder.