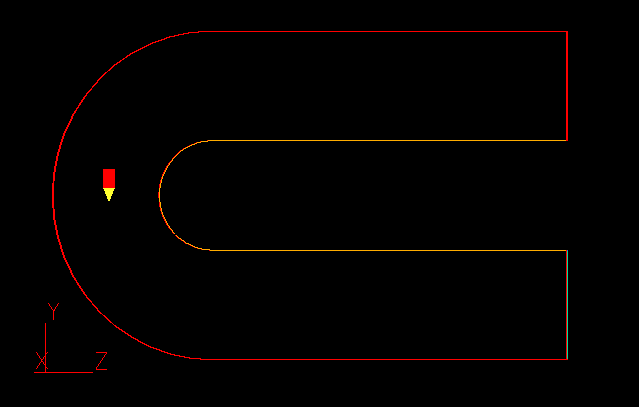
The case considered is a 2-phase frozen-"snow"-laden gas flow in a U-bend. The basic single-phase setup is taken from BFC library case B527, which is then modified to include the second, heavy, phase. The geometry is shown below:
The snow particles will be given a diameter, Dp, of 1.0 mm and a density of 110 kg/m3. The volume fraction of particles at the inlet will be 0.1%, and they will be travelling at the same velocity as the carrier gas, namely 20 m/s.
The inlet temperature of gas is 0°C and snow particles have -23°C. The phase specific heats, CP1 and CP2, are 5000 and 4000, J/(kgK), correspondingly. The gas thermal conductivity, k, is 0.01 W/(mK) and its kinematic viscosity, n, is 10-5, m2/s.
Interphase drag coefficient correlation is given as
Cd = min( 200., 24/Re(1.+0.15Re0.687) )
where:
Re = VslipDp/n
with
Vslip being the relative velocity between the particulate and gas
phases.
Interphase heat transfer is controlled by local Nusselt Number correlation as
Nu = hDp/k = 2.( 1.+0.1Re0.3 )
where:
h is a heat transfer coefficient, W/(m2K)
The task is to calculate the distribution of phase velocities, temperatures and pressure drop.
From the system level:
To enter the PHOENICS-VR environment, click on the PHOENICS icon on the desktop, or click on Start, programs, PHOENICS, PHOENICS.
From the commander level:
To enter the PHOENICS-VR environment, click on the 'Run vre' icon in the left column.
In PHOENICS-VR environment,
Start with an 'empty' case - click on 'File' then on 'Start New Case', then on 'Core', then click on 'OK'; to confirm the resetting.
To enter VR Editor:
This is the default mode of operation.
Load Library case B527.
Click on 'File', then 'Load from Libraries'. Enter B527 in the 'case number' data entry box, and click OK.
Clcik on 'SATELLITE command prompt' and press 'return' key until the geometry appears on the screen. You may now close the command prompt.
Activate solution of the second phase and enthalpy.
Click on 'Main menu'.
Click on 'Models'.
Click on 'One_phase', and from the list of multi-phase models select 'IPSA Full'. Click 'OK'.
Click 'Energy Equation "OFF"', and from the list select 'Enthalpy'. Click 'OK'.
Click on 'STATIC' next to 'ENTHALPY' to set it 'TOTAL'.
Set interphase linkages
Click on 'Settings' next to IPSA_FULL.
Set 'Interphase Coefficient (CFIPS)' GRND and click on 'Store' to set it ON.
Set 'CFIPB' 0.001 - particle diameter in meters.
Change 'Interphase Heat transfer' CINT for 'Variable' H2 to 1.e20 and for H1 to GRND. Click on '>' and '<' to scroll the list of variables.
Click 'Previous Panel'.
Provide the storage for auxiliary variables.
Click on 'Settings' next to 'Solution control/Extra variables'.
Set 'Activate Storage' 'STORE' CD for drag coefficient and click 'Apply'.
Repeat for KOND, NUSS, REYN and VREL to activate the storage for gas thermal conductivity, Nusselt number, Reynolds number and relative phase velocity.
Click on 'Previous panel'.
Set properties of the first phase.
Click on 'Properties'.
Set 'Storage' for density to 'ON'.
Set ENUL=1.e-5 for the gas kinematic viscosity and 'Storage' ON.
Click on 'Page Dn'.
Click 'Advanced settings' PIL'
Set CP1 = 5000.
Set 'PRNDTL' for 'Variable's R1 = 1.e10 to cut-off phase diffusion. (You might need to click 'Page Dn' again)
Set PRNDTL for H1=-2.e-6 which is -k/CP1 and
Click on 'Page Up' and Click on 'Previous Panel'
Set the Kelvin-to-Celsius and enthalpy-to-temperature parameters for the first phase.
Click on 'Temperature' NOT SET. From the list of options, select 'Linear in H' and click 'OK'.
Set T(Ho)=-273. click 'Storage' to set it 'ON'.
Click on 'Page Dn'
Set 'Reference temp'= 273.
Click on 'Page Up'
Set properties of the second phase.
Click on 'Set Phase 2 Properties'.
Set RHO=110 and click on 'Page Dn'
Set CP2 = 4000.
Click on 'Page Dn' or 'Line Dn', as appropriate.
Click 'Advanced settings' PIL'
Set 'PRNDTL' for 'Variable's R2 = 1.e10 to cut-off phase diffusion.
Set PRNDTL for H2=1.e10 to cancel the 2nd phase diffusion
Click on 'Page Up'
Click on 'Previous Panel'
Set the Kelvin-to-Celsius and enthalpy-to-temperature parameters for the second phase.
Click on 'Temperature' NOT SET, from the list of select 'Linear in H' and click 'OK'.
Set T(Ho)=-273. Click 'Storage' to set it 'ON'.
Set interface properties.
Click on 'Set interface properties'
Set 'PHINT' for 'Variable's H1 = 1.25 which is CP1/CP2.
Set initial values
Click on 'Initialisation'
Set initial value of W1 and W2 to 20
Set initial value of R1 (phase 1 volume fraction) to 0.999, and that of R2 (phase 2 volume fraction) to 0.001. You will have to use the < > buttons next to Variable to scroll the list of variables.
Set initial values of H1 to 1.365E+06 and initial value of H2 to 1.0E+06. These are the inlet enthalpies.
Set value of KOND to 0.01.
Click on 'Apply'
Set relaxation parameters
Click on 'Numerics'.
Set 'Total number of iterations' to 400.
Set the Global convergence criterion to 0.1%.
Click on 'Relaxation control', and set the DTFALS values for W1, W2, V1, V2 to 0.1 and H1 and H2 to 1000.
Click 'Previous panel', 'Top Menu', 'OK'.
Set the inlet values for the two phases
Click twice on the inlet object (called IN). Click on 'Attributes'.
Click on 'Phase fluid'
Set the inlet density to 0.999. (This is actually the phase 1 density, 1.0, multiplied by the phase 1 volume fraction, 0.999).
Set Temperature = 0°C.
Set Z-direction velocity to -20.0 m/s.
Click on Setting values for 'Phase 1' to switch to Phase 2.
Click on 'Phase fluid'
Set the inlet density for phase 2 to 0.11 (this is the phase 2 density, 110.0, multiplied by the phase 2 volume fraction, 0.001)
Set inlet temperature to -23°C.
Set the inlet velocity for phase 2 to -20.0 m/s in the Z direction.
Click on 'OK', 'OK'.
Allow the second phase to leave the domain at the outlet.
Click twice on the outlet object (called OUTLET). Click on 'Attributes'.
Set the Ph 1 Coefficient to 1.
Set the Ph 2 Coefficient to 110.0 (this is the phase 1 coefficient multiplied by the phase 2 density).
Click on 'OK', 'OK'.
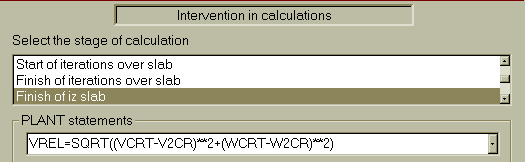
Make the PLANT settings for phase relative velocity.
Click on 'Run, Pre processor, Fortran creator (Plant Menu)'.
Select 'Intervention in calculations', then click on 'Add'.
Select 'Finish of IZ-slab'.
Make settings for VREL as shown on the image below.
Click 'OK' to close the window.
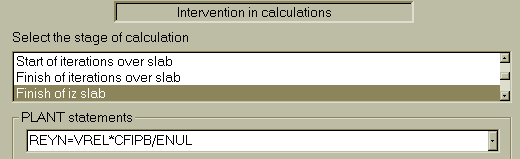
Make the PLANT settings for particle Reynolds number.
Click on 'Add'.
Select 'Finish of IZ-slab'.
Make settings for REYN as shown on the image below.
Click 'OK' to close the window.
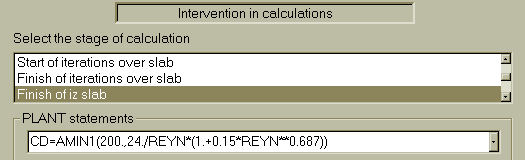
Make the PLANT settings for particle drag coefficient.
Click on 'Add'.
Select 'Finish of IZ-slab'.
Make settings for CD as shown on the image below.
Click 'OK' to close the window.
Make the PLANT settings for particle Nusselt number.
Click on 'Add'.
Select 'Finish of IZ-slab'.
Make settings for NUSS as shown on the image below.
Click 'OK' to close the window.

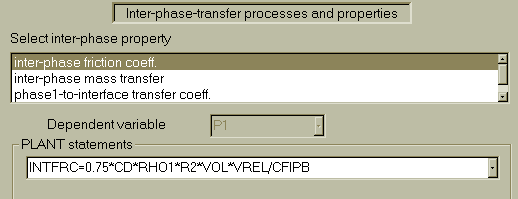
Make the PLANT settings for interphase friction coefficient.
Select 'Inter-phase-transfer processes and properties', then click on 'Add'.
Select ''Interphase friction coefficient'.
Make settings for INTFRC as shown on the image below.
Click 'OK' to close the window.
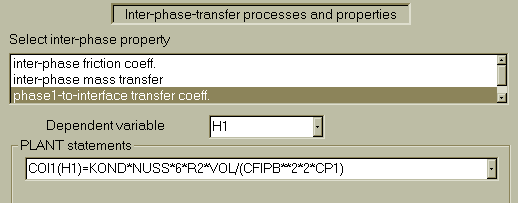
Make the PLANT settings for interphase heat transfer coefficient.
Select 'Interphase-transfer processes', then click on 'Add'.
Select 'Phase1-to-interface transfer coefficient'.
Set 'Dependent variable' to H1.
Make settings for COI1(H1) as shown on the image below.
Click on 'OK' to close the window.
Click on 'Exit' then on 'OK'.
In the PHOENICS-VR environment, click on 'Options', then on 'Run Version'.
For 'Earth', select 'Private'.
Click on 'Run', 'Solver'(Earth)' and clcik on 'OK' to confirm the action.
Click on 'Yes' to allow the re-building EARTH using current Ground to proceed.
In the PHOENICS-VR environment, click on 'Run', 'Post processor',then GUI Post processor(VR Viewer)', and view the velocity vectors; pressure and temperature contours.
In the PHOENICS-VR environment, click on 'Save as a case', make a new folder called 'TWOPHS' (e.g.) and save as 'CASE2' (e.g.).
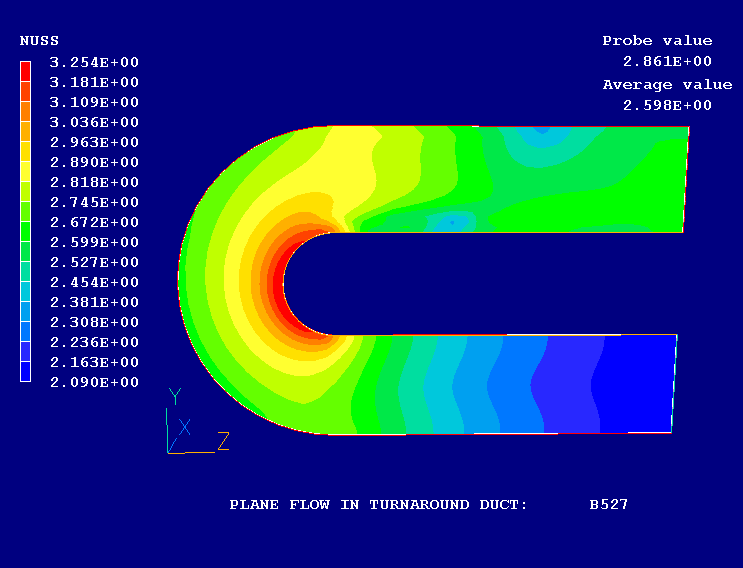
The following picture shows the NUSS contours: