The following instructions will allow the user to set up and run the simulation of gas in a pipe using VR. Initially, the domain is filled with a solid, and the pipe is then 'carved' out by making the pipe sections from a fluid material.
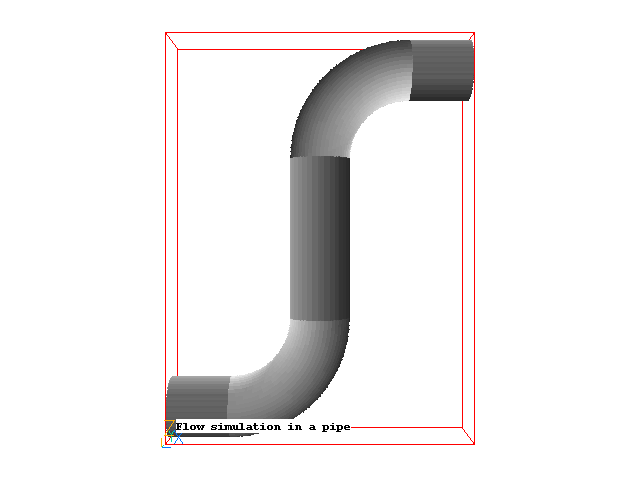
The flow is three-dimensional and its geometry is shown below:
From the system level:
To enter the PHOENICS-VR environment, click on the PHOENICS icon on the desktop, or click on Start, programs, PHOENICS, PHOENICS.
In PHOENICS-VR environment:
Start with an 'empty' case - click on 'File' then on 'Start New Case', then on 'Core', then click on 'OK'; to confirm the resetting.
To enter VR Editor:
This is the default mode of operation.
Set the domain size, activate solution of variables and set the domain material:
Click on 'Main Menu' and set 'Flow simulation in a pipe' as the Title.
Click on 'Geometry'.
Change the X-domain Size to 1.5 m.
Change the Y-domain size to 0.3 m.
Change the Z-domain size to 2.0 m.
Click 'OK' to close the Grid mesh settings dialog.
Click on 'Models'.
Leave the 'solution for velocities and pressure' ON.
Select the LVEL Turbulence model in 'Turbulence Models'. This turbulence model is based on distance to the nearest wall, and is suitable for confined flows where the grid is fairly coarse.
Click on 'Properties'.
Click on the button next to 'The current domain material is'. Select 'Gases', then '5 Carbon Dioxide at 27 deg C, 1 atm'.
Click on 'Top menu' then on 'OK'.
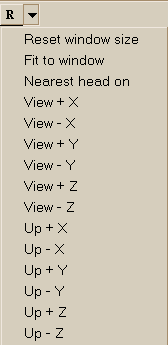
The domain no longer fits the screen. To resize the view so that it does fit, click on the pull-down next to the 'R' icon on the toolbar then 'Fit to Window'.
Create the objects making up the scene:
Click on the 'Object Management' button (
on the toolbar or
on the hand set). This will display a (currently empty apart from the domain) list of objects.
Create a solid to fill the domain:
Click on 'Object', 'New', 'New object', 'Blockage' on the top bar menu of the Object Management Dialog to bring up the object specification dialog box.
Change name to SOLID.
Click on 'Size' and set SIZE of object as:
Xsize: tick the 'to end' box
Ysize: tick the 'to end' box
Zsize: tick the 'to end' box
Click on 'Options' and then tick 'Hide object'. The solid will no longer obscure the rest of the geometry.
Click on 'OK' to close the Object Specification Dialogue box.
Create the first horizontal pipe segment:
Click on 'Object', 'New', 'New object', Blockage'.
Change name to PIPE-1.
Click on 'Size' and set SIZE of object as:
Xsize: 0.3
Ysize: 0.3
Zsize: 0.3
Click on 'Shape' and in 'Geometry', select public\Basic_Shapes\cylinder and then click on 'Open'.
Click on 'General'.
Click on 'Attributes', click on 'Other materials', 'Domain material'.
Click on 'Options', 'Rotation options', then on 'Rotate object face' until the cylinder has the right orientation: the axis is in X-direction (e.g. option #9)
Click on 'OK' to exit the attributes menu, and click on 'OK' to close the Object Dialogue box.
Create the second horizontal pipe section by duplication from PIPE-1:
Click on 'Duplicate object or group'
or on 'Object', 'Copy objects' on the top bar of the Object Management Dialog, then 'OK' to confirm the duplication. A new object will appear at the bottom of the object list.
Click on 'X position up' until the copy object has moved as far as possible in X (Xpos=1.2)
Click on 'Z position up' until the copy object has moved as far as possible in Z (Zpos=1.7)
Double click on the copy object to bring up the object specification dialog box and change name to PIPE-2.
Click on 'OK' to close the Object specification dialog box.
Create the vertical pipe section:
Click on 'Object', 'New', 'New object', Blockage'.
Change name to PIPE-3.
Click on 'Size' and set SIZE of object as:
Xsize: 0.3
Ysize: 0.3
Zsize: 0.8
Click on 'Place' and set Position of object as:
Xpos: 0.6
Ypos: 0.0
Zpos: 0.6
Click on 'General'.
Click on 'Shape' and in 'Geometry', select public\Basic_Shapes\cylinder and then 'Open'.
Click on 'General'.
Click on 'Attributes', then on 'Other materials', 'Domain material'.
Click on 'OK' to exit the attributes menu, and click on 'OK' to close the Object Dialogue box.
The cylinder already has its axis in the Z-direction as desired.
Create the lower pipe bend:
Click on 'Object', 'New', 'New object', 'Blockage'.
Change name to BPIPE-1.
Click on 'Size' and set SIZE of object as:
Xsize: 0.6
Ysize: 0.3
Zsize: 0.6
Click on 'Place' and set Position of object as:
Xpos: 0.3
Ypos: 0.0
Zpos: 0.0
Click on 'Shape' and in 'Geometry', select public\Basic_Shapes\pipebend and then 'Open'.
Click on 'General'.
Click on 'Attributes', then on 'Other materials', 'Domain material'.
Click on 'OK' to exit the Attributes menu, and click on 'OK' to close the Object Dialogue box.
Rotate the pipe to give it the right direction (clip art rotation 9/24).
Create the second pipe bend by duplication from BPIPE-1:
Click on 'Duplicate object or group' and 'OK'.
Click on the copy object to bring up the object specification dialog box.
Change name to BPIPE-2.
Click on 'Place and set POSITION of object as:
Xpos: 0.6
Ypos: 0.0
Zpos: 1.4
Click on 'Options'.
Click on 'Rotation options' and set value to 3.
Click on 'OK' twice.
Create the fluid inlet by duplication from PIPE-1:
Click on PIPE-1 in the Object management dialog or on screen to select it.
Click on 'Duplicate object or group' and 'OK'.
Click on 'Size' and set SIZE of object as:
Xsize: 0.0
Ysize: 0.3 (already correct)
Zsize: 0.3 (already correct)
Click on 'General'.
Change name to INLET.
Define Type: Inlet.
Click on 'Attributes' to define the inlet conditions.
Set the velocity of the inflow in X-direction at 1.0 m/s.
Click on 'OK' to close the Attributes menu, and on 'OK' in the Object Dialogue Box.
Create the fluid outlet by duplication from PIPE-2:
Click on PIPE-2 in the Object management dialog or on screen to select it.
Click on 'Duplicate object or group' and 'OK'.
Click on 'Size' and set SIZE of object as:
Xsize: 0.0
Ysize: 0.3 (already correct)
Zsize: 0.3 (already correct)
Click on 'Place' and set Position of object as:
Xpos: 1.5
Ypos: 0.0 (already correct)
Zpos: 1.7 (already correct)
Click on 'General'.
Change name to OUTLET.
Define Type: Outlet.
Leave the default values in the Attributes Dialogue box.
Click on 'OK'.
Setting the Probe Location
Before running the solver,it is a good idea to place the probe in a suitable place to monitor the convergence of the solution. Too close to an inlet, and the value will settle down very quickly before the rest of the solution. Placed in a recirculation zone, it may still show traces of change even though the bulk solution is converged. In this case, somewhere downstream of the buildings is fine.
Click on the probe icon
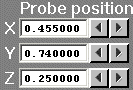
on the toolbar or double-click the probe itself, and move the probe to X=0.75, Y=0.15, Z=1.5.
Setting the Grid
Click the mesh toggle
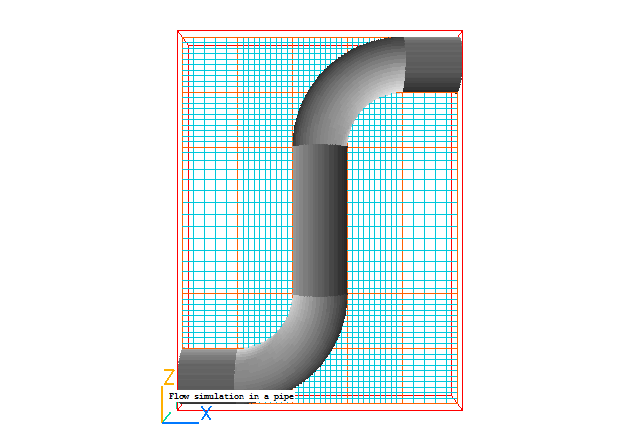
to display the grid. The orange lines are region boundaries, located at the edges of the objects. The blue lines are 'ordinary' grid lines inserted by the auto-mesher. In this case, the default grid in X (37 cells) and Z (55 cells) is adequate. However, the Y grid has only one cell, as all the objects extend right across the domain. There is nothing to tell the automesher that cells are also required in Y. Click on the mesh to display the Grid mesh dialog.
Click 'Edit all regions in Y direction'. Turn the auto grid settings to Off. Set 10 cells in the Y direction. Click Ok to close the Y direction settings dialog
We will also take the opportunity to practice setting the remainder of the grid manually.
Click 'Edit all regions in X direction'. Turn the auto grid settings to Off. Set the cells for the X regions as follows:
Region Cells Power Symmetric 1 5 1 No 2 10 1 No 3 10 1 No 4 10 1 No 5 5 1 No Click OK to close the X direction setting dialog.
Click 'Edit all regions in Z' Turn the auto grid settings to off. Set the regions as follows (using Power Law for Region 3):
Region Cells Power Symmetric 1 10 1 No 2 10 1 No 3 15 1.3 Yes 4 10 1 No 5 10 1 No Click Ok to close the Z direction settings dialog, then OK to close the Grid mesh dialog. The final grid should look like this:
Click the mesh toggle again to turn the mesh display off.
Set the remaining solution-control parameters:
Click on 'Main Menu' and then on 'Numerics'.
The default number of iterations is 1000. This is more than enough to determine whether a model has been set up correctly, but is not always enough to obtain an accurate solution.
Reset the total number of iterations to 200. More than this are required for full convergence, but 200 are enough for the purposes of the tutorial to generate a reasonable flow field.
In the PHOENICS-VR environment, click on 'Run', 'Solver'(Earth), and click on 'OK' to confirm running Earth.
In the PHOENICS-VR environment, click on 'Run', 'Post processor', then GUI Post processor (VR Viewer) Viewer)'. Click 'OK' on the file names dialog to accept the default files.
To view:
To select the plotting variable:
To change the direction of the plotting plane, set the slice direction to X, Y or Z ![]()
To change the position of the plotting plane, move the probe using the probe position buttons
To make the objects see-through, click the 'Wire-frame' toggle (to the right of the Macro button on the second row of buttons).
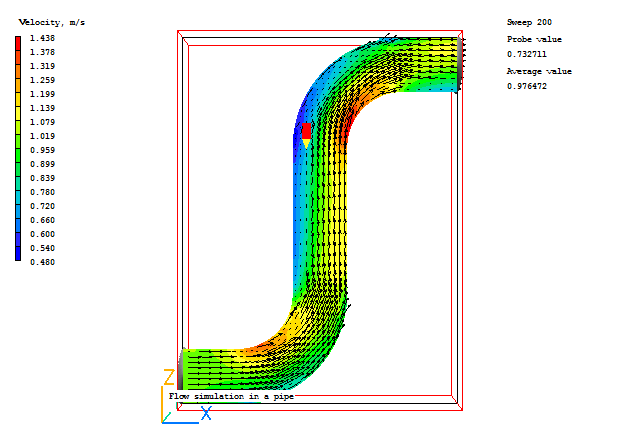
A typical plot from this case (with all BLOCKAGE objects hidden) is:
In the PHOENICS-VR environment, click on 'Save as a case', make a new folder called 'PIPE' (e.g.) and save as 'CASE1' (e.g.)