This workshop example demonstrates how to use the Object Duplication facility of the VR Editor in setting up a geometry. The simulation is run and the results are viewed.
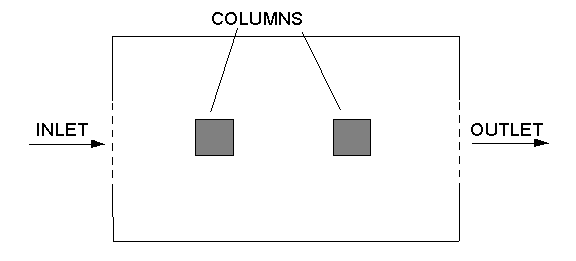
The flow in the example is two-dimensional and its geometry is shown in the figure below.
From the system level:
To enter the PHOENICS-VR environment, click on the PHOENICS icon on the desktop, or click on Start, programs, PHOENICS, PHOENICS.
In PHOENICS-VR environment:
Start with an 'empty' case - click on 'File' then on 'Start New Case', then on 'Core', then click on 'OK'; to confirm the resetting.
To enter VR Editor:
This is the default mode of operation.
Set the domain size, and activate solution of the required variables:
Click on 'Main Menu' and set 'Domain Faces and Duplication in VRE' as the Title.
Click on 'Geometry'.
Change the X-Domain Size to 2.00 m.
Click on 'OK' to close the Grid mesh dialog.
Click on 'Models'.
Leave the 'solution for velocities and pressure' ON.
Select the LVEL Turbulence model in 'Turbulence Models'.
Create the internal surfaces of the duct:
Click on 'Domain Faces'.
Set 'Wall' to 'Yes' for the Xmin, Xmax, Zmin and Zmax faces.
Click on 'OK' to close the Domain Faces Dialogue Box, and 'OK' again to close the reminder to set / check boundary conditions. The default settings are fine.
Click on 'OK' to exit the Main Menu.
Click on 'Reset' button and then 'Fit to window'/'OK'.
Create the first column:
Click on 'Settings', 'New' and 'New Object'. Select Type: Blockage.
Change name to BLOCK1 (which stands for first blockage).
Click on 'Size' and set size of object as:
Xsize: 0.2
Ysize: 1.0
Zsize: 0.2
Click on 'Place' and set Position of object as:
Xpos: 0.5
Ypos: 0.0
Zpos: 0.4
Click on 'General'.
Define Type as Blockage (default).
Click on 'OK' to exit from the Object Dialogue Box.
Create the second column by duplicating BLOCK1:
Click on the 'Duplicate object or group' button/'OK'.
Double click on the duplicated object to bring up the object specification dialog box
Change name to BLOCK2 (which stands for second block).
Click on 'Place' and change position to:
Xpos: 1.3
Ypos: 0.0
Zpos: 0.4
Click on 'OK' to exit from the Object Dialogue Box.
Create the fluid inlet:
Click on 'Settings', 'New' and 'New Object'. Select Type: Inlet. Select 'X plane' for the plane the plate lies in.
Change name to INLET.
Click on 'Size' and set size of object as:
Xsize: 0.0
Ysize: 1.0
Zsize: 0.2
Click on 'Place' and set Position of object as:
Xpos: 0.0
Ypos: 0.0
Zpos: 0.4
Click on 'General'.
Click on 'Attributes'.
Set the velocity to 2.00 m/s in the X-direction.
Click on 'OK' twice.
Create the fluid outlet:
Click on 'Settings', 'New' and 'New Object'. Select Type: Outlet. Select 'X plane' for the plane the outlet lies in.
Change name to OUTLET.
Click on 'Size' and set size of object as:
Xsize: 0.0
Ysize: 1.0
Zsize: 0.2
Click on 'Place' and set Position of object as:
Xpos: 2.0
Ypos: 0.0
Zpos: 0.4
Click on 'OK'.
Set the grid:
Click on the 'Mesh toggle' button. The default mesh (shown as orange and blue lines) will appear on the screen.
The grid is adequate for the tutorial. The orange lines are 'regions', defined by the bounding boxes of the objects.
Click on 'Mesh toggle' again to turn off the mesh display.
Set the remaining solution control parameters:
Click on 'Main Menu', and then on 'Numerics'.
Set the number of iterations to 300.
Click on 'Top menu' to return to the top menu.
Click on 'OK' to exit the Main Menu.
Set the Monitor Location
The progress of the solution can be monitored at the probe location, which is currently located inside BLOCK1, where nothing will happen.
On the handset, set the X position to 1.8. This is near the exit, and the flow should settle down there.
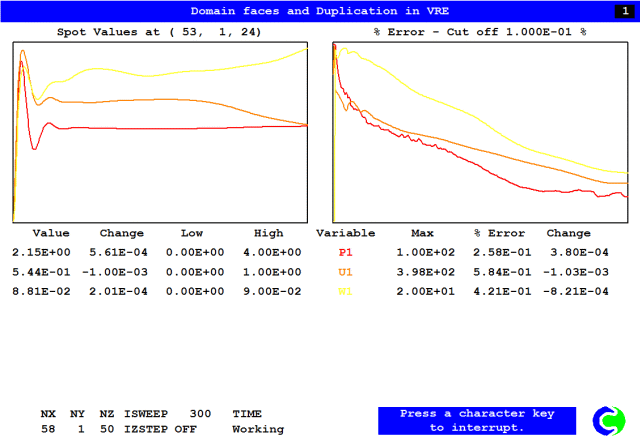
In the PHOENICS-VR environment, click on 'Run', 'Solver'(Earth), and click on 'OK'; to confirm running Earth. The convergence monitor screen should look similar to this:
In the PHOENICS-VR environment, click on 'Run', 'Post processor',then GUI Post processor (VR Viewer) . Click 'OK' on the file names dialog to accept the default files.
To view:
To select the plotting variable:
To change the direction of the plotting plane, set the slice direction to X, Y or Z ![]()
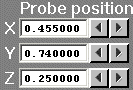
To change the position of the plotting plane, move the probe using the probe position buttons
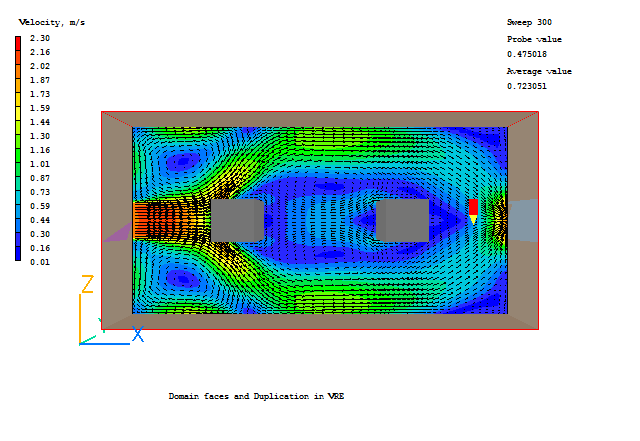
A typical plot from this case is:
In the PHOENICS-VR environment, click on 'Save as a case', make a new folder called 'DUPLICAT' (e.g.) and save as 'CASE1' (e.g.).