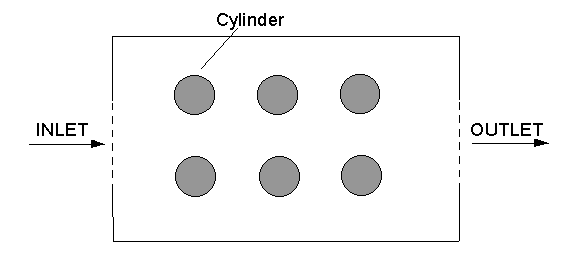
This workshop example shows how to use the Object Arraying facility of the VR Editor. The flow is two-dimensional and its geometry is shown in the figure below. The shaded circles represent cylinders. Velocity and pressure will be solved.
From the system level:
To enter the PHOENICS-VR environment, click on the PHOENICS icon on the desktop, or click on Start, programs, PHOENICS, PHOENICS.
In PHOENICS-VR environment:
Start with an 'empty' case - click on 'File' then on 'Start New Case', then on 'Core', then click on 'OK' to confirm the resetting.
To enter VR Editor:
This is the default mode of operation.
Set the domain size and activate solution of required variables:
Click on 'Main Menu' and set 'Flow between cylindrical obstacles' as the Title.
Click on 'Geometry'.
Change the X-domain Size to 2.0 m.
Click 'OK' to close the Grid mesh settings dialog.
Click on 'Models'.
Leave the 'solution for velocities and pressure' ON.
Select 'Laminar' from 'Turbulence models'.
Click on 'Top menu', then on 'OK'.
Click on 'Reset' button on the movement control panel and then click on 'Fit to window'/'OK'.
Create the fluid inlet:
In the Object-management dialog, click on 'Object', 'New' and 'New Object'. Select Type: Inlet. Select 'X plane' for the plane the inlet lies in.
Change name to INLET.
Click on 'Size' and set SIZE of object as:
Xsize: 0.0
Ysize: tick 'To end'
Zsize: 0.5
Click on 'Place' and set POSITION of object as:
Xpos: 0.0
Ypos: 0.0
Zpos: 0.25
Click on 'General'.
Define Type: Inlet
Click on 'Attributes' and set velocity in X-direction to 0.01 m/s.
Click on 'OK' to close the Attribute menu, and on 'OK' in the Object Dialogue Box.
Create the fluid outlet:
Click 'Object', 'New' and 'New Object'. Select Type: Outlet. Select 'X plane' for the plane the outlet lies in.
Change name to OUTLET.
Click on 'Size' and set SIZE of object as:
Xsize: 0.0
Ysize: tick 'To end'
Zsize: 0.5
Click on 'Place' and set POSITION of object as:
Xpos: tick 'At end'
Ypos: 0.0
Zpos: 0.25
Click on 'General'.
Define Type: Outlet.
Leave the default values in the 'Attributes' dialogue box.
Click on 'OK' to exit from the Object Dialogue Box.
Create the first cylinder:
Click on 'Settings', 'New' and 'New Object'. Select type: Blockage (default).
Change name to CYL-1 (which stands for cylinder 1).
Click on 'Size' and set SIZE of object as:
Xsize: 0.15
Ysize: tick 'To end'
Zsize: 0.15
Click on 'Place' and set POSITION of object as:
Xpos: 0.4
Ypos: 0.0
Zpos: 0.25
Click on 'Shape'.
In 'Geometry', select /public/SHAPES/CYLINDER and click on 'Save'.
Click on 'Options' and 'ROTATION options', then click on the ^ button (arrow up) beside 'Rotate Object Face' until the cylinder is aligned as in the earlier diagram (this should be at position 5). We are working through the 24 possible ways of placing a shape into a box until we find the right one.
Click on 'OK'.
Leave the default values in the Attributes menu.
Click on 'OK' to close the Object Dialogue Box.
Create the remaining cylinders by copying from CYL-1. We want 3 cylinders in the X direction, with a 0.5m space between them, and 2 in Z, spaced at 0.35m.
Check that the original cylinder is still selected and appears with white high-lighting, if not click on it, then on OK.
Now click on the 'Duplicate using array' button on the handset. It has this icon:
In the new dialogue box, set
Direction Dimension Pitch X 3 0.5 Y 1 0.0 Z 2 0.35 The 'Offsets' boxes should all be left at 0.0.
Click on 'OK' to exit the dialogue box.
An array of cylinders appears in the domain.
Set the grid:
Click on the 'Mesh toggle' button. The default mesh (shown as blue and orange lines) will appear on the screen. The orange lines are 'regions', defined by the bounding boxes of the objects. This mesh (61 in X, 55 in Z) is adequate for this tutorial. Click on 'Mesh toggle' again to turn off the mesh display.
Set the remaining solution control parameters:
Click on 'Main Menu' and then on 'Numerics'.
Set the number of iterations to 500.
Click on 'Relaxation control', and set the 'Reference velocity' to 0.01. The automatic convergence works best when this value is genuinely typical of the velocities in the domain. The default value of 10 m/s is too large for the inlet velocity of 0.01m/s.
Click on 'Previous panel' then 'Top menu' to return to the top menu.
Click on 'OK' to exit the Main Menu.
In the PHOENICS-VR environment, click on 'Run', 'Solver'(Earth), and click on 'OK'; to confirm running Earth.
In the PHOENICS-VR environment, click on 'Run', 'Post processor',then GUI Post processor (VR Viewer) . Click 'OK' on the file names dialog to accept the default files.
To view:
To select the plotting variable:
To change the direction of the plotting plane, set the slice direction to X, Y or Z ![]()
To change the position of the plotting plane, move the probe using the probe position buttons
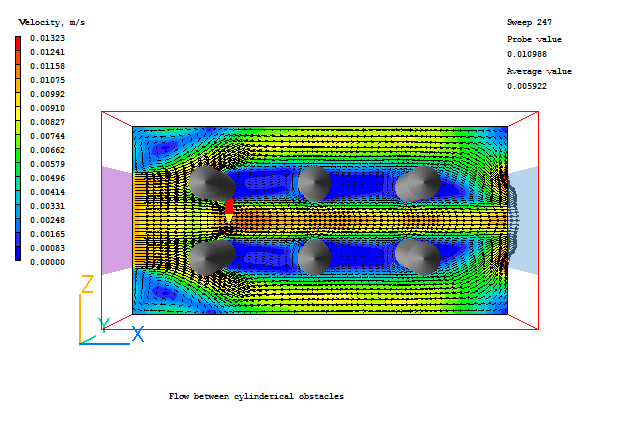
A typical plot from this case is:
In the PHOENICS-VR environment, click on 'Save as a case', make a new folder called 'COLUMNS' (e.g.) and save as 'CASE1' (e.g.).