Encyclopaedia Index
TUTORIAL- Simulation of a Labyrinth Flow
This tutorial shows how to set up and run the simulation of steady turbulent flow of
air with heat exchange.
The geometry is 2-dimensional, of (y-direction) depth 1.0m, with the other dimensions
shown in the figure below:
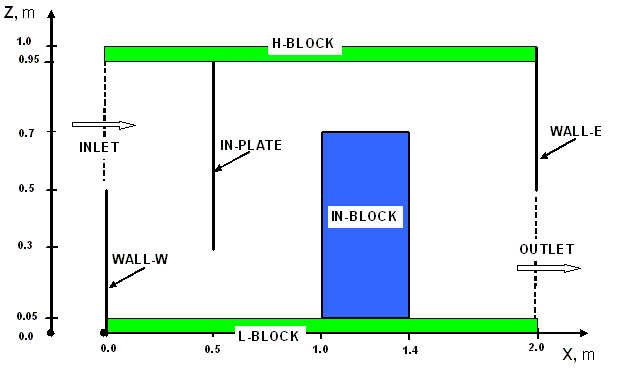
wherein:
- INLET is an aperture through which air at 20 degrees C enters at a prescribed velocity
of 0.5m/s, giving an inlet Reynolds Number of 15000;
- OUTLET is a fixed-pressure aperture, where the pressure is held close to 0.0 Pa,
relative to the external pressure;
- WALL-W is an adiabatic boundary wall;
- WALL-E is an adiabatic boundary wall;
- IN-PLATE is an internal plate, the only function of which is to obstruct the flow;
- IN-BLOCK is a block of copper;
- H-BLOCK is a block of aluminium;
- L-BLOCK is a block of aluminium, supplied uniformly with 100 watts of electrical heat.
Preliminary remarks
- The tutorial must therefore explain how to:
- introduce objects comprising blocks of different materials;
- provide them with heat sources, if required;
- introduce also objects (inlets, outlets, plates) having no volume, which however affect
the flow in prescribed ways;
- prescribe the sizes and positions of each object.
- In addition to physically-meaningful data of the above kind, all CFD codes, and
therefore PHOENICS also, require non-physical inputs such as:
- a grid of computational cells;
- instructions about how many iterations to make of the trial-and-error solution process;
- how much data to print.
- The non-physical settings suggested below are such as to make the calculations rapid
rather than accurate.
- Other tutorials will be provided which will enable you to explore the influences of the
settings on accuracy and speed of calculation.
Starting the Tutorial
First close any windows which are already running PHOENICS modules.
Then activate the PHOENICS Satellite module, in its VR-Editor mode, by either:
- clicking on the PHOENICS VR icon on the desktop; or
- typing 'vre' at the Command prompt.
Your working directory, i.e. the folder in which will appear all the files which
the tutorial creates, will be, according to the method which you have used:
- /PHOENICS/d_priv1 [You can change this, if you wish, by clicking the 'options
button' at the top of the satellite panel; or
- that of the prompt itself.
In PHOENICS-VR Editor
- When the Editor starts execution, what it shows on the screen at first will depend on
what happens to be in your working directory. You can disregard this. [If you see the
words: 'Display From Current Q1', click the top-right X so as to close the panel ]
- Make a fresh start by:
- clicking first on 'File';
- then on 'Start New Case';
- then on 'Core';
- then on 'OK' to confirm the resetting.
- You are now ready to begin.
Set the Domain Size
- Click on 'Menu' or 'M' (according to whether the 'Control panel' is visible) [If it
is not, you can make it so by clicking on 'View'].
- Set 'Simulation of a Labyrinth Flow' as the Title.
- Click on 'Geometry'.
- Change the X-Domain Size to 2.0 m.
- Click 'OK' to close the Grid mesh settings dialog.
Note that clicking on '?' at the top right of any panel and
then on a menu button will provide 'help'.
Select the Working Fluid
- Click on 'Properties' which will elicit a page like this:
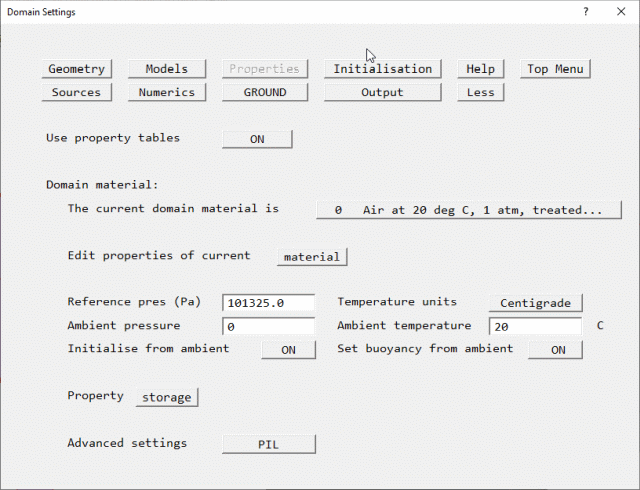
- Note that
- the properties are already those of "Air at 20 deg C, 1 atm" by default.
- The ambient (external) temperature is 20 degC, and the ambient pressure is 0 Pa relative
to 1atm.
- Since these correspond to the present case, there is no setting to make.
- Click on 'Top menu' to accept.
Indicate for Which Variables Solution Is Required
- Click on 'Models'.
- Leave the 'solution for velocities and pressure' ON.
- Click on 'energy equation', and select 'Temperature'. Click on 'OK'.
- Leave the turbulence models setting as 'Chen-Kim KE'. This indicates that the 'KE' and 'EP'
(kinetic energy and dissipation rate of turbulence) are to be solved by the CHEN method.
- Click on 'Top menu', then on 'OK' to exit the Main Menu.
Re-sizing the Domain
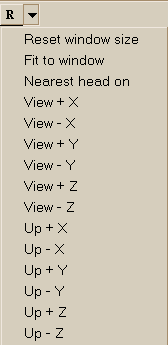
The domain no longer fits the screen; to resize, click on the pull-down arrow next to
the 'R' icon on the toolbar; then 'Fit to window'.
Introduce the Required Objects
- Click on the 'object-management' button ('O' on the toolbar or
 on the Control panel, also sometimes called 'hand set').
- This will display the 'object-management' window with a list of objects of which only
'DOMAIN' is currently present.
- You will now introduce the objects which you require, one-by-one, giving each a position
and size, corresponding to those in the above diagram.
- You will also introduce 'attributes', for example material, velocity or temperature, so
completing the description of the situation to be simulated.
Introduce the H-BLOCK object
- In the Object-management dialog, click on 'Object', 'New' and 'New Object'. Select Type: Blockage (default).
- Change name to H-BLOCK (which stands for 'high block').
- Click on 'Size' and set SIZE of object as:
- Xsize: tick 'To end'
- Ysize: tick 'To end'
- Zsize: 0.05
- Click on 'Place' and set Position of object as:
- Xpos: 0.0
- Ypos: 0.0
- Zpos: Tick 'At end'
- Click on 'General'.
- To change the material, click on 'Attributes', click on 'Types',
- click on 'Solids' then 'OK', and then on '100 ALUMINIUM at 27 deg C' and 'OK';.
- Click on 'OK' to exit the Attributes menu,
- and on 'OK' to close the Object Specification Dialogue Box.
- H-BLOCK will now appear in the Object-Management list of objects.
Introduce the L-BLOCK object
- Click on 'Object', 'New' and 'New Object'. Select Type: Blockage (default).
- Change name to L-BLOCK (which stands for 'low block').
- Click on 'Size' and set SIZE of object as:
- Xsize: tick 'To end'
- Ysize: tick 'To end'
- Zsize: 0.05
- Note that no position coordinates need to be given because the defaults (0.0, 0.0, 0.0)
suffice in this case.
- Click on 'General'.
- Click on 'Attributes', select material as ALUMINIUM as above.
- Set an Energy Source of 100 W. Click on 'Adiabatic', and select 'Fixed Heat Flux'. Click on
Value and enter 100.
- Click on 'OK' to return to the Object Specification Dialogue Box, and on 'OK' to close
the Object Dialogue Box.
Introduce the WALL-E object
- Click on 'Object', 'New' and New Object'. Select Type: Plate.
- Select 'X plane' for the plane the plate lies in.
- Change name to WALL-E (which stands for 'east wall').
- Click on 'Size' and set SIZE of object as:
- Xsize: 0.0
- Ysize: tick 'To end'
- Zsize: tick 'To end'
- Click on 'Place' and set Position of object as:
- Xpos: tick 'At end'
- Ypos: 0.0
- Zpos: 0.5
- Click on 'OK' to close the Object Specification Dialogue Box.
Introduce the WALL-W object
- Click on 'Object', 'New' and New Object'. Select Type: Plate.
- Select 'X plane' for the plane the plate lies in.
- Change name to WALL-W (which stands for 'west wall').
- Click on 'Size' and set SIZE of object as:
- Xsize: 0.0
- Ysize: tick 'To end'
- Zsize: 0.5
- Note that no position coordinates need to be given because the defaults (0.0, 0.0, 0.0)
suffice in this case.
- Click on 'OK' to close the Object Specification Dialogue Box.
Introduce the IN-PLATE object
- Click on 'Object', 'New' and New Object'. Select Type: Plate.
- Select 'X plane' for the plane the plate lies in.
- Change name to IN-PLATE (which stands for 'interior plate').
- Click on 'Size' and set SIZE of object as:
- Xsize: 0.0
- Ysize: tick 'To end'
- Zsize: 0.65
- Click on 'Place' and set Position of object as:
- Xpos: 0.5
- Ypos: 0.0
- Zpos: 0.3
- Click on 'OK' to close the Object Specification Dialogue Box.
Introduce the IN-BLOCK object
- Click on 'Object', 'New' and New Object'. Select Type: Blockage.
- Change name to IN-BLOCK (which stands for 'interior block').
- Click on 'Size' and set SIZE of object as:
- Xsize: 0.4
- Ysize: tick 'To end'
- Zsize: 0.65
- Click on 'Place' and set Position of object as:
- Xpos: 1.0
- Ypos: 0.0
- Zpos: 0.05
- Click on 'General'.
- Click on 'Attributes', then on 'Other materials', select 'Solids' then '103 COPPER at 27 deg C'.
- Click on 'OK' to return to the Object Dialogue Box,
- and on 'OK' to close the Object Dialogue Box.
Introduce the INLET object
- Click on 'Object', 'New' and New Object'. Select Type: Inlet.
- Select 'X plane' for the plane the inlet lies in.
- Change name to INLET.
- Click on 'Size' and set SIZE of object as:
- Xsize: 0.0
- Ysize: tick 'To end'
- Zsize: 0.45
- Click on 'Place' and set Position of object as:
- Xpos: 0.0
- Ypos: 0.0
- Zpos: 0.5
- Click on 'General'.
- Click on 'Attributes' and set the velocity in X-direction to 0.5 m/s.
- Leave the temperature at 'Ambient', 20 degrees C for the inflowing air.
- Click on 'OK' to close the Attributes menu,
- and on 'OK' in the Object Specification Dialogue Box.
Introduce the OUTLET object
- Click on 'Object', 'New' and New Object'. Select Type: Outlet.
- Select 'X plane' for the plane the outlet lies in.
- Change name to OUTLET.
- Click on 'Size' and set SIZE of object as:
- Xsize: 0.0
- Ysize: tick 'To end'
- Zsize: 0.45
- Click on 'Place' and set Position of object as:
- Xpos: tick 'At end'
- Ypos: 0.0
- Zpos: 0.05
- Click on 'General'.
- Ensure Type is set to 'Outlet'.
- Leave the default values in the Attributes dialogue box.
- Click on 'OK' to exit the Object Dialogue Box.
Inspect the 'default' Grid
The PHOENICS satellite sets a computational grid which has sufficient lines at least to
coincide with the extremities of all the objects which have been introduced, with some
additional lines in-between.
This is known as the 'default' grid. It can be displayed by pressing the 'Mesh toggle'
button, which in the present case should generate a picture such as the following.
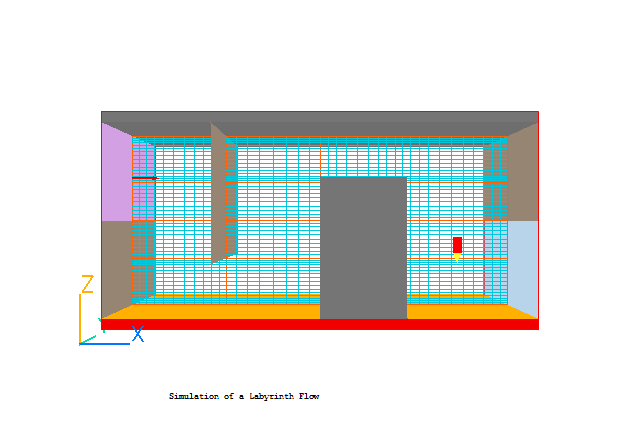
- Click anywhere on the grid, and the 'Grid Mesh Settings' dialog box will appear.
The
grid in all three directions is set to 'Auto'. This gives 39 cells in X, 60 in Z, and 1 cell
in Y. New users are advised not to make any changes at present.
The grid may be too coarse (i.e. lines are too few) for accuracy but will suffice for the
tutorial. Click on 'OK' to close the dialog box.
- Click on 'Mesh toggle' again to turn off the mesh display.
The Remaining Solution-Control Parameters
- Click on 'Menu' and then on 'Numerics', in order to inspect and modify other solution-control parameters.
The default number of iterations is 1000. This is more than enough to determine whether a model has been set up
correctly, but is not always enough to obtain an accurate solution.
Reset the 'Total number of iterations' to 500.
- Click on 'Top menu' to return to the top menu.
- Click on 'OK' to exit the Main Menu.
Setting the Probe Location
- Before running the solver, it is a good idea to place the probe in a suitable place to
monitor the convergence of the solution. Too close to an inlet, and the value will settle
down very quickly before the rest of the solution. Placed in a recirculation zone, it may
still show traces of change even though the bulk solution is converged. In this case, to
the right of the IN-BLOCK object is fine.
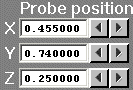
- Click on the probe icon
 on the toolbar or double-click the probe itself, and move the probe to X=1.8,
Y=0.5, Z=0.3.
on the toolbar or double-click the probe itself, and move the probe to X=1.8,
Y=0.5, Z=0.3.
Running the Solver
You are now ready to perform the simulation by activating the PHOENICS solver module
(known as 'Earth').
In order to do so, click on 'Run', 'Solver' (Earth), and click on 'OK' to confirm.
You will then see, in quick succession, indications on the screen of:
- the activation of the module;
- the reading by the solver of the input data which your tutorial session has prepared for
it;
- the progress of the calculation, represented by the generation of curves which look like
this:
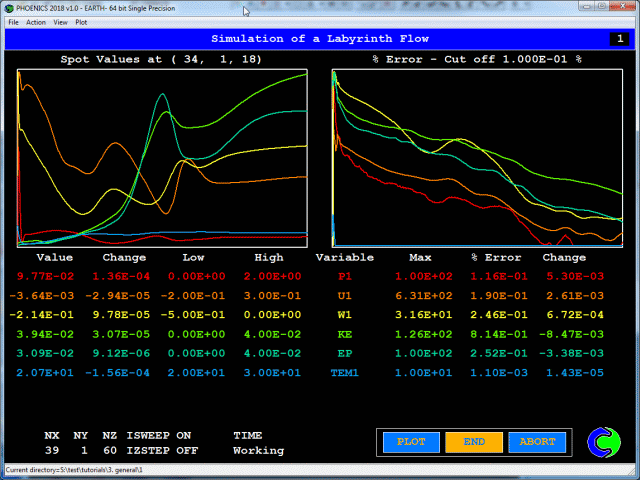
When the simulation has converged or the maximum number of iterations has been reached, the simulation will
terminate. The monitor windows will close and PHOENICS will open a summary document in a browser tab.
Simulations can be interrupted by hitting any key on the keyboard, and terminated early by clicking the
'Endjob' button to terminate the calculation and to return to the VR Environment.
You are now able to launch the VR Viewer, in order to inspect the results of your
calculation.
Using the VR Viewer
Click on 'Run', 'Post processor', then 'GUI - Post processor (VR Viewer)'. Click 'OK' on
the file names dialog to accept the default files.
- To view:
- Velocity vectors - click on the 'Vector toggle'
 .
Vectors are coloured by the current plotting variable, but their length is always related
to the absolute velocity.
.
Vectors are coloured by the current plotting variable, but their length is always related
to the absolute velocity.
- Contours - click on the 'Contour toggle'

- Streamlines - click on the 'Streamline management' button

- Iso-surfaces - click on the 'Iso-Surface toggle'

- To select the plotting variable:
- To select Pressure - click on the 'Select Pressure' button

- To select Velocity - click on the 'Select Velocity' button

- To select Temperature - click on the 'Select Temperature' button

- To select any other variable - click on the 'Select a Variable' button

- To change the direction of the plotting plane, set the slice direction to X, Y or Z

- To change the position of the plotting plane, move the probe using the probe position
buttons
Alternatively, click on the probe icon on the toolbar or double-click the probe itself to bring up the Probe
Location dialog.
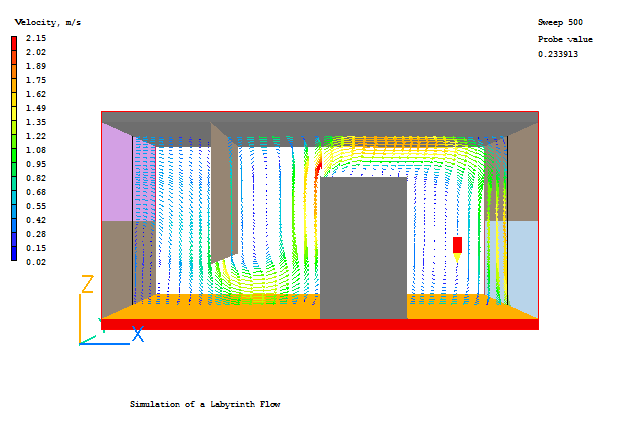
- A typical plot from this case is (Y-slice showing vectors coloured by velocity):
Checking the Source Balance
- It is very important to know whether the inflows and outflows of mass and energy are in
balance. If they are, it is a good sign that the solution is convergent. If they are not,
the solution is definitely not converged. For further information on the assessment of
Convergence, see the lecture Convergence
monitoring and control.
- Open the Object-Management dialog, and right-click on the Domain entry. From the context
menu select 'Show nett sources'.
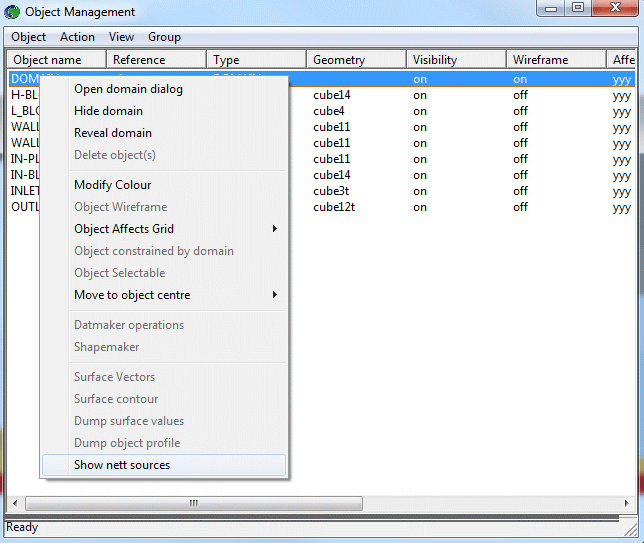
- This will display the sources and sinks of all variables.
- The section showing 'Nett source of R1 at...' shows the mass source in kg/s at each
inlet and outlet.
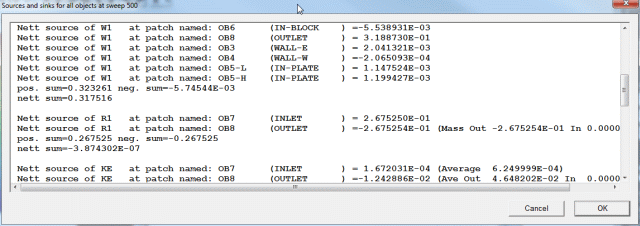
- Positive values are inflows,negative values are outflows. The 'nett sum' at the end of
the section should be close to zero, as all the mass entering must leave.
- The section showing 'Nett source of TEM1 at...' shows the energy source in Watts for
each heat source or sink. It also shows the average temperature in the in-flowing and out-flowing streams.
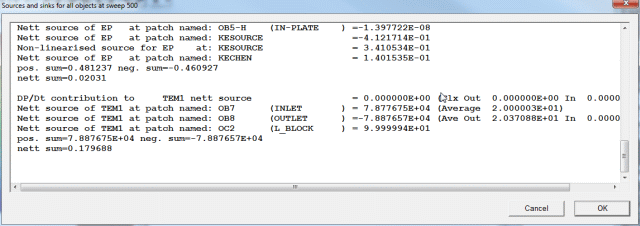
- Positive values are sources, negative values are sinks. The energy source at the inlet
is mass flow*specific heat*inlet temperature in Kelvin. The 'nett sum' should also be
close to zero. In this case, it is a bit high, showing that convergence is not complete.
- These balances can also be checked by inspecting the RESULT file. This contains an echo
of the inputs, a selection of the solution and the source balances. Click on 'File', 'Open
file for editing', then 'Result'. Scroll down the file until you reach the section headed
'Sources and sinks'.
Saving the Results
- In the VR Viewer click on 'File' then 'Save as a case'; create a new folder called
'LABYRINTH ' and save as 'CASE1'.
These actions will place in the folder the following
files:
- case1.q1, a copy of the Q1 file created in the tutorial;
- case1.res, a copy of the RESULT file printed by the solver at the end of its execution;
- case1.phi, a copy of the PHI file which the VIEWER uses as the basis of its displays;
- case1.gif, an image representing the approach to convergence, such as was shown above;
and
- case1.pat and case1.pbc, which there is no need to describe now.
These will be discussed in later tutorials.